Create a NuGet package

When you package your Razor class library, you have a binary deliverable that other Blazor projects can reference and the components within it can be used in those projects.

In an earlier unit, you created a Razor class library with a modal component that delivers a modal dialog window for Blazor applications. To share that component for use in other applications, you need to package and place it in either a repository or a folder where other developers can acquire it.

In this unit, you update that project and generate a NuGet package. Finally, you deploy that NuGet package to your Blazor server application.

Add package properties to FirstClassLibrary

Begin by updating the FirstClassLibrary project with properties that allow it to be packaged for deployment as a NuGet package.

  1. Open the project file for the FirstClassLibrary project. Either double-click the project in Visual Studio Solution Explorer or open the FirstClassLibrary.csproj file in Visual Studio Code.
  2. Near the top of the file, in the section with the <PropertyGroup> tag, add the following content before the closing </PropertyGroup> tag:XMLCopy <PackageId>My.FirstClassLibrary</PackageId> <Version>0.1.0</Version> <Authors>YOUR NAME</Authors> <Company>YOUR COMPANY NAME</Company> <Description>This is a Razor component library with a cool modal window component.</Description> </PropertyGroup> This code defines your Razor class library as having <PackageId> “My.FirstClassLibrary” and <Version> 0.1.0. Enter your own name and company name in those two fields.

Package the library for reuse

Next, you run the .NET command at the command line to package the Razor class library so that other applications outside your solution can reference it.

You can run these same steps in your continuous integration process to package a library and deploy it to NuGet.org, a GitHub repository, or another location for your organization to share.

In the same folder as the FirstClassLibrary.csproj file, run the following command:

.NET CLICopy

dotnet pack

This command writes a file named My.FirstClassLibrary.0.1.0.nupkg to your bin/Release folder.

Add a reference to the NuGet package in the MyBlazorApp application

You already referenced the FirstClassLibrary project in your MyBlazorApp application, because it was in the same folder structure as the web application.

Now, you undo that project reference and add a reference to the NuGet package that you created earlier.

The following steps don’t describe a typical configuration. Library projects that reside in the same folders or solution as the applications that want to reference them can reference the project directly, as you saw in the earlier exercise.

  1. Open the MyBlazorApp.csproj file either by double-clicking the MyBlazorApp project name in Visual Studio or by opening the file in Visual Studio Code.
  2. In the MyBlazorApp.csproj file, remove the following line:<ProjectReference Include="..\FirstClassLibrary\FirstClassLibrary.csproj" />
  3. In the same folder as MyBlazorApp.csproj, run the following command:.NET CLICopydotnet add package My.FirstClassLibrary -s ../FirstClassLibrary/bin/Release This command grabs the NuGet package that you created earlier, installs a copy in your local NuGet package cache, and then adds a reference to that package in the MyBlazorApp.csproj file.

Check your work

Did your new package install properly? Can you start the FirstServer application and see a modal window when the application starts?

Let’s find out:

  1. Start the MyBlazorApp application either in Visual Studio, by selecting F5, or in the MyBlazorApp folder, by running the following command:dotnet run
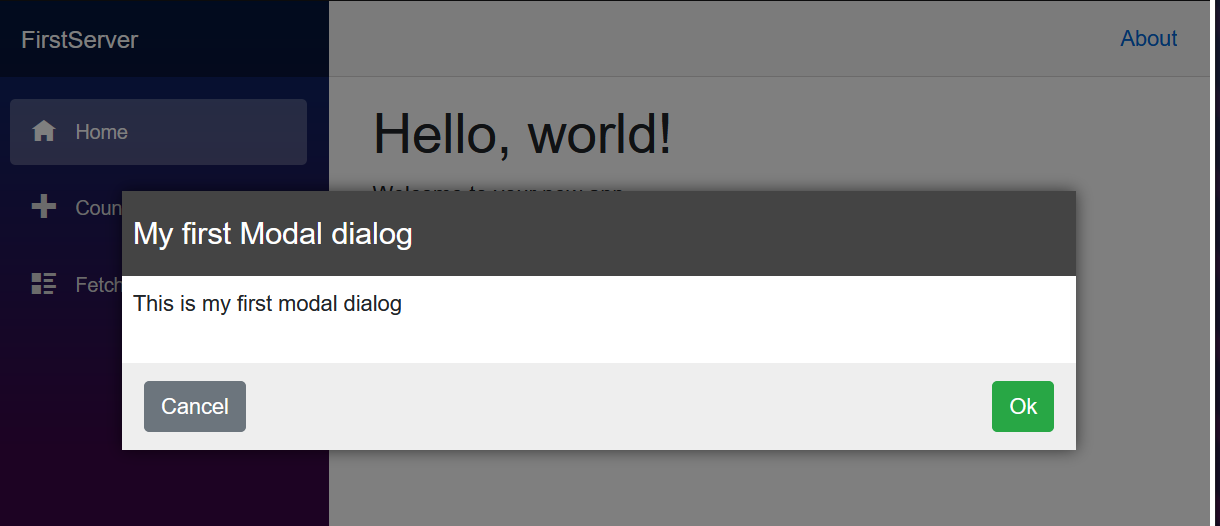
  2. In your browser, go to the home page of the MyBlazorApp application: https://localhost:5000.Is the My first Modal dialog dialog displayed? If so, congratulations! You successfully packaged and deployed the FirstClassLibrary project correctly. Applications everywhere can now use your modal window component by referencing your newly created NuGet package.
incomptia training courses malaysiadex

Package a Razor class library

A task that you often need to perform is packaging libraries for reuse by other developers. NuGet packaging makes it trivial for any developer anywhere to acquire and properly configure all the .NET references for their applications.

In the preceding unit, you built your modal dialog component and used it in your own application. Now you want to reuse it in other applications.

In this unit, you learn the steps necessary to configure a Razor class library as a NuGet package. You also learn how to package the library for distribution by using a package-repository service, such as NuGet.org, or GitHub repositories.

Configure a Razor class library for NuGet packaging

The .NET ecosystem makes it easy to define the properties that are necessary for other developers to identify and use your components. You can define all these properties in the project file (*.csproj) of your Razor class library so they travel with the library. The properties are then updated appropriately when your library is updated.

You can configure fields that identify your package in the Visual Studio Project Properties – Package dialog, or you can create entries directly in the *.csproj file yourself.

The four fields required to create a package are:

FieldDescriptionDefault value
PackageIdA package identifier, unique across the entire NuGet repository.AssemblyName of the library
VersionA specific version number in the form Major.Minor.Patch[-Suffix], where -Suffix optionally defines prerelease versions.1.0.0
AuthorsThe authors of the package.AssemblyName
CompanyThe name of the company that’s responsible for creating and publishing the package.AssemblyName

Some of these fields have default values, and it might look funny to publish a package with a company name of MyFirstLibrary. We strongly recommend that you explicitly define these values.

In the preceding unit, you learned that the static content of a Razor class library is available at _content/[PACKAGE_ID]/, and now you see where the PackageId value is configured.

A sample project file with these values configured might look like the following example:

XMLCopy

<PropertyGroup>
    <PackageId>Learn.MyFirstLibrary</PackageId>
    <Version>0.1.0-alpha1</Version>
    <Authors>Susan Developer, Terry Programmer</Authors>
    <Company>AdventureWorks</Company>
</PropertyGroup>

When you’re building the project, you can also configure it to generate a NuGet package either by selecting the option to Generate NuGet Package on Build in the Visual Studio Project Properties dialog or by adding a GeneratePackageOnBuild entry next to the other package fields, as shown here:

XMLCopy

<GeneratePackageOnBuild>True</GeneratePackageOnBuild>

You can configure many optional project properties, including:

  • Description that’s appropriate for display in the NuGet repository
  • A copyright notice
  • Licensing information
  • Icons
  • Project URLs

For a full list of properties, check the Microsoft documentation on the MSBuild pack target.

Package the library

After you write the library configuration into the *.csproj file, you can generate the NuGet package either in Visual Studio, by right-clicking the project and selecting the Pack command, or in the project folder, by running the following command:

.NET CLICopy

dotnet pack

This dotnet pack command generates a package with the PackageID and version number and places it in the standard project build output folder.

exchange server certification training courses malaysia

Create a Razor class library

In this exercise, you create a modal dialog in a Razor class library that you can reuse in the default Blazor template application.

Screenshot of the modal dialog to be created in the standard Blazor template application.

Create the Razor class library project

This module uses the .NET 8.0 SDK. Ensure that you have .NET 8.0 installed by running the following command in your preferred command terminal:

.NET CLICopy

dotnet --list-sdks

Output similar to the following example appears:

ConsoleCopy

6.0.317 [C:\Program Files\dotnet\sdk]
7.0.401 [C:\Program Files\dotnet\sdk]
8.0.100 [C:\Program Files\dotnet\sdk]

To begin, create the Razor class library project for a modal dialog component. You can use Visual Studio to create a new project, or you can create the project in a new folder with the .NET command-line tool, as shown here:

.NET CLICopy

dotnet new razorclasslib -o FirstClassLibrary -f net8.0

Build the modal dialog component

Next, build the modal component in your project with an appropriate CSS file to go with it, and provide an initial format.

  1. Rename the Component1.razor file to Modal.razor and the Component1.razor.css file to Modal.razor.css. The Modal.razor file contains the component you’ll create, and in the future you can add blank text files to your project and format them with content for Razor or CSS appropriately.
  2. Add the following Razor content to the Modal.razor file:razorCopy@if (Show) { <div class="dialog-container"> <div class="dialog"> <div class="dialog-title"> <h2>@Title</h2> </div> <div class="dialog-body"> @ChildContent </div> <div class="dialog-buttons"> <button class="btn btn-secondary mr-auto" @onclick="OnCancel">@CancelText</button> <button class="btn btn-success ml-auto" @onclick="OnConfirm">@ConfirmText</button> </div> </div> </div> } @code { [Parameter] public string Title { get; set; } [Parameter] public string CancelText { get; set; } = "Cancel"; [Parameter] public string ConfirmText { get; set; } = "Ok"; [Parameter] public RenderFragment ChildContent { get; set; } [Parameter] public bool Show { get; set; } [Parameter] public EventCallback OnCancel { get; set; } [Parameter] public EventCallback OnConfirm { get; set; } } This component has several nice features that you can share between your projects:
    • A title.
    • Cancel and Confirm buttons, with labels you can configure and click events you can manage.
    • You can set the inner content of the component through the ChildContent parameter.
    • You can control the display state of the dialog with the Show parameter.
  3. To provide default formatting for the component, add the following CSS to the Modal.razor.css file:cssCopy.dialog-container { position: absolute; top: 0; bottom: 0; left: 0; right: 0; background-color: rgba(0,0,0,0.5); z-index: 2000; display: flex; animation: dialog-container-entry 0.2s; } @keyframes dialog-container-entry { 0% { opacity: 0; } 100% { opacity: 1; } } .dialog { background-color: white; box-shadow: 0 0 12px rgba(0,0,0,0.6); display: flex; flex-direction: column; z-index: 2000; align-self: center; margin: auto; width: 700px; max-height: calc(100% - 3rem); animation: dialog-entry 0.4s; animation-timing-function: cubic-bezier(0.075, 0.820, 0.165, 1.000); } @keyframes dialog-entry { 0% { transform: translateY(30px) scale(0.95); } 100% { transform: translateX(0px) scale(1.0); } } .dialog-title { background-color: #444; color: #fff2cc; padding: 1.3rem 0.5rem; } .dialog-title h2 { color: white; font-size: 1.4rem; margin: 0; font-family: Arial, Helvetica, sans-serif; line-height: 1.3rem; } .dialog-body { flex-grow: 1; padding: 0.5rem 3rem 1rem 0.5rem; } .dialog-buttons { height: 4rem; flex-shrink: 0; display: flex; align-items: center; background-color: #eee; padding: 0 1rem; }

This Markup gives some default coloring to a title bar and button bar at the bottom, making it more interesting than a simple set of gray-colored HTML elements.

Reference and use the modal component

With the modal component now residing in the FirstClassLibrary project, add a new Blazor server application and start using the modal component.

  1. Create a new Blazor server project called MyBlazorApp in a folder next to the FirstClassLibrary project either by using the Visual Studio Add New Project feature or by running the following command:.NET CLICopydotnet new blazor -o MyBlazorApp -f net8.0
  2. Add a reference to the FirstClassLibrary project in the MyBlazorApp project, either by using the Visual Studio Add Reference feature or by running the following command from the MyBlazorApp folder:.NET CLICopydotnet add reference ../FirstClassLibrary

With this project reference in place, the MyBlazorApp application can interact with the components in the FirstClassLibrary project.

  1. Make it easier to reference the modal component by adding an entry to the end of the _Imports.razor file in the Components folder of the MyBlazorApp application. By doing so, you can reference the modal component without having to specify the entire namespace for the component..NET CLICopy@using FirstClassLibrary
  2. Add a modal component to the opening page of this application, the Components/Pages/Home.razor filerazorCopy<Modal Title="My first Modal dialog" Show="true"> <p> This is my first modal dialog </p> </Modal> a. Give the component a title, “My first Modal dialog.”
    b. Add a short paragraph to be displayed inside the dialog. This content describes the purpose of the dialog.
    c. Set the dialog to be visible by using the Show parameter.

Check your work

Start the MyBlazorApp application with dotnet run and navigate to it in your browser. The My first Modal dialog dialog should be displayed in front of the rest of the content on the screen.

Screenshot of the modal dialog you've just created in the standard Blazor template application.

dynamics 365 training courses malaysia

Razor class library creation and concepts

Components in web applications give developers the ability to reuse portions of an application user interface throughout the application. By using Razor class libraries, developers can share and reuse these components across many applications.

In this unit, you learn how to create a Razor class library. You then use it to share rendered and static content for Blazor applications to customize and display.

Razor class libraries

A Razor class library is a .NET project type. It contains Razor components, pages, HTML, Cascading Style Sheet (CSS) files, JavaScript, images, and other static web content that a Blazor application can reference. Like other .NET class library projects, Razor class libraries can be bundled as a NuGet package and shared on NuGet package repositories such as NuGet.org.

Let’s look at the default template for creating a Razor class library.

Create a project by using the default template

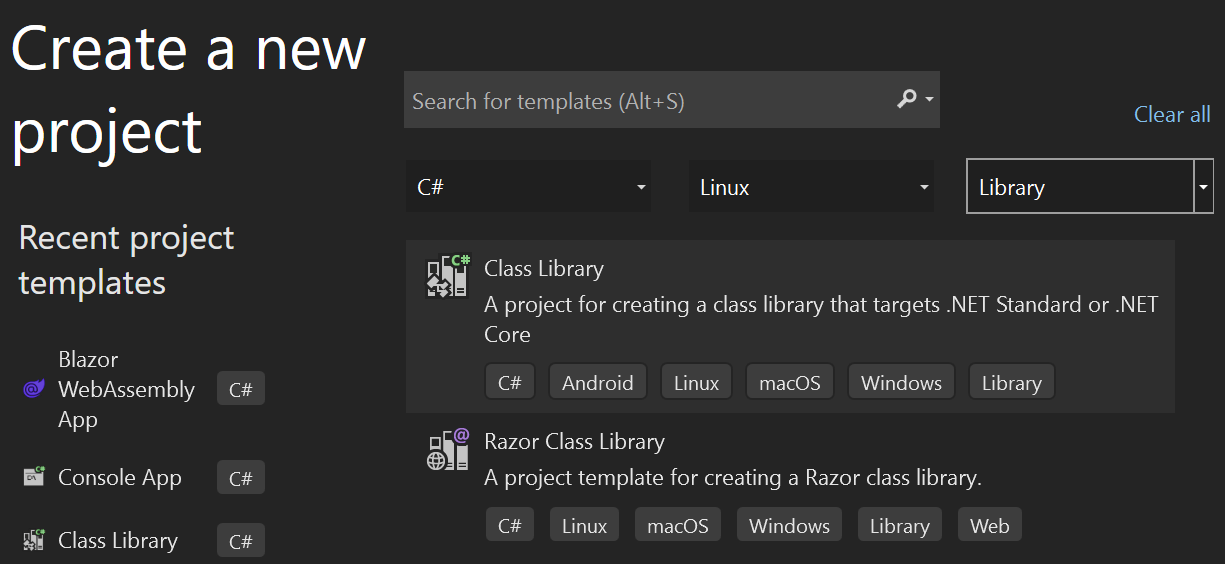
You can optionally begin creating a Razor class library in Visual Studio by selecting File > New Project.

Screenshot of the "Create a new project" pane Razor component library template links in Visual Studio.

You can also create projects on a command-line interface by running the following command:

.NET CLICopy

dotnet new razorclasslib -o MyProjectName

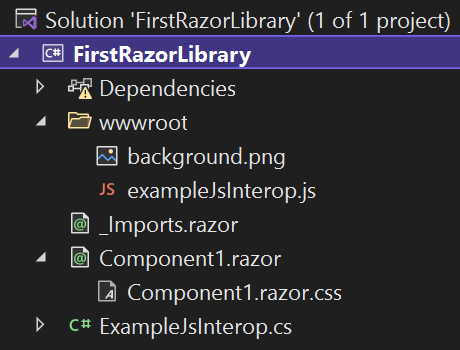
This template delivers an initial component named Component1, which contains several important features that your components can use:

  • An isolated cascading style sheet named Component1.razor.css, which is stored in the same folder as Component1.razor. The Component1.razor.css file is conditionally included in a Blazor application that references Component1.
  • Static content, such as images and JavaScript files, which is available to a Blazor application at runtime and referenced within Component1. This content is delivered in a wwwroot folder that behaves in the same way as a wwwroot folder in an ASP.NET Core or Blazor application.
  • .NET code, which executes functions that reside in the included JavaScript file.
Screenshot of Visual Studio Solution Explorer, showing the default project contents.

Differences between a class library and a Razor class library

A class library is a common package delivery structure in .NET applications, and a Razor class library is similar in structure with a few other features configured in the project file.

XMLCopy

<Project Sdk="Microsoft.NET.Sdk.Razor">

  <PropertyGroup>
    <TargetFramework>net8.0</TargetFramework>
    <Nullable>enable</Nullable>
    <ImplicitUsings>enable</ImplicitUsings>
  </PropertyGroup>

  
  <ItemGroup>
    <SupportedPlatform Include="browser" />
  </ItemGroup>

  <ItemGroup>
    <PackageReference Include="Microsoft.AspNetCore.Components.Web" Version="8.0.0" />
  </ItemGroup>

</Project>
  • The project file contains an SDK reference to Microsoft.NET.Sdk.Razor to declare that it contains and creates Razor content as a Razor class library.
  • The SupportedPlatform entry declares that this library can be used in a browser platform, namely WebAssembly.
  • The PackageReference to the Microsoft.AspNetCore.Components.Web library gives access to the base Blazor components that are shipped with the framework. This access lets you use those simple components to help you build more complex components.

Razor component contents

This initial Razor component is simple. It contains only an HTML div element with a short block of text:

razorCopy

<div class="my-component">
    This component is defined in the <strong>FirstRazorLibrary</strong> library.
</div>

This component interacts with other Blazor components and pages that reference it in the same way that you would expect a component delivered in the same project to behave. That is, the CSS isolated script in the Component1.razor.css file is rendered inline with the rest of the application’s CSS in the application.css file.

Static asset delivery

You can reference the contents of the wwwroot folder relatively among the other contents of that folder. You can also relatively reference the components’ individual CSS files, such as Component1.razor.css, as files in the same base folder. For example, the default CSS adds a two pixel dashed red border and a background image style that uses the background.png image in the wwwroot folder. No path is required to make this reference from the CSS to the content that resides in the wwwroot folder.

cssCopy

.my-component {
    border: 2px dashed red;
    padding: 1em;
    margin: 1em 0;
    background-image: url('background.png');
}

The contents of the wwwroot folder are available for referencing by hosted Blazor applications with an absolute folder reference in the format:

.NET CLICopy

/_content/{PACKAGE_ID}/{PATH_AND_FILENAME_INSIDE_WWWROOT}

Reference a Razor class library

In a .NET solution, where the Razor class library resides on the disk next to a Blazor application that references the library, you can update the Blazor application to reference the Razor class library by using the standard Visual Studio Add Reference dialog and by using the .NET CLI add reference command, as shown here:

.NET CLICopy

dotnet add reference ../MyClassLibrary

For libraries that are delivered in NuGet package form, you can add a reference by using the Visual Studio NuGet package installer or by using the .NET CLI add package command, as shown here:

.NET CLICopy

dotnet add package MyClassLibrary

dynamics 365 supply chain training courses malaysia

Introduction to Razor class libraries

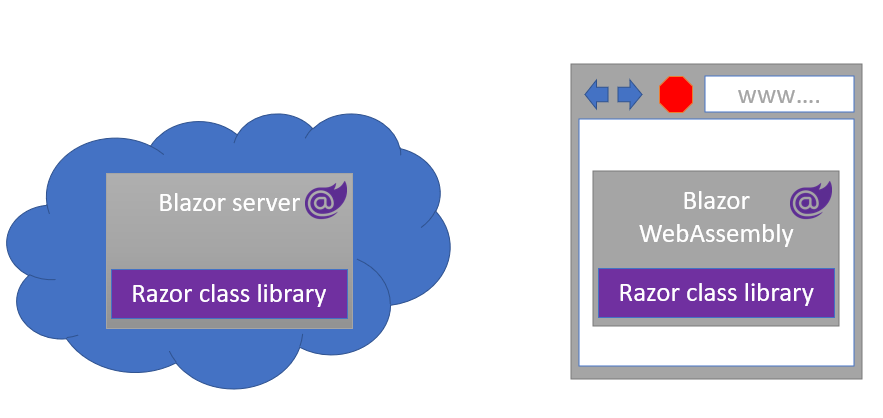
By using Razor class libraries, you can share and reuse user-interface components between Blazor applications. In this module, you focus on building and sharing components for Blazor applications.

Diagram showing a Razor class library being used in the Blazor server instance and Blazor WebAssembly.

Example scenario

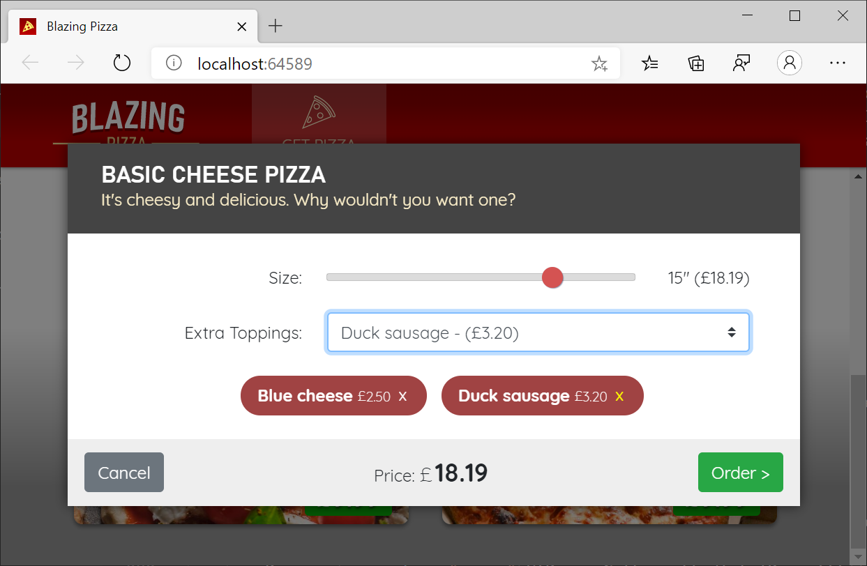
Let’s suppose that you work for a consulting firm, where you build web applications for various clients. You have a collection of web features, such as modal window components, that you make available to your clients. To save time, you want to be able to reuse these features across applications.

By using Razor class libraries, you can share the features across the applications that you build for your customers.

Screenshot of an example modal window component that can be shared across Blazor applications.

What are you going to do?

In this module, you create a Razor class library to accomplish the following goals:

  • Present a modal dialog box with default theming.
  • Use and customize the modal dialog in a Blazor application.
  • Package the modal window dialog for use with other applications.

What is the main goal?

By the end of the module, you’re able to design a modal window component that you can share and customize across other Blazor applications.

Prerequisites

  • Familiarity with HTML, CSS, and JavaScript web development.
  • Novice ability to write C# code.
  • An integrated development environment (IDE).

 Note

This module uses the .NET CLI (Command Line Interface) and Visual Studio Code for local development. After completing this module, you can apply the concepts using Visual Studio (Windows) or continued development using Visual Studio Code (Windows, Linux, and macOS).

This module uses the .NET 8.0 SDK. Ensure that you have .NET 8.0 installed by running the following command in your preferred command terminal:

.NET CLICopy

dotnet --list-sdks

Output similar to the following example appears:

ConsoleCopy

6.0.317 [C:\Program Files\dotnet\sdk]
7.0.401 [C:\Program Files\dotnet\sdk]
8.0.100 [C:\Program Files\dotnet\sdk]

dynamics 365 sales training courses malaysia

Build reusable components with Blazor

By using Blazor components, you can reuse sections of HTML in your applications. Learn how to build a component, package it, and share it with other Blazor applications.

Learning objectives

By the end of this module, you’re able to:

  • Build a Razor class library that contains Blazor components.
  • Package a Razor class library for use in other Blazor applications.
  • Reference a Razor class library in a Blazor application and use its components.

Prerequisites

  • Familiarity with HTML
  • Knowledge of Blazor components and applications
  • Experience working with .NET Core and more recent projects

dynamics 365 finance training courses malaysia

Server-side request forgery

Server-side request forgery (SSRF) describes situations where a web application is fetching a remote resource without validating the user-supplied URL. It allows an attacker to coerce the application to send a crafted request to an unexpected destination.

Attackers might also use this functionality to import untrusted data into code that expects to only read data from trusted sources, allowing them to circumvent input validation.

A URL or query string seen in a web browser’s address bar, when used as an input parameter, could be a perfect example of user input needing sanitization.

During code review, you came across a seemingly harmless REST web GET request:

C#Copy

string url = Request.Form["url"];
var client = new HttpClient();
HttpResponseMessage response = await client.GetAsync(url);

Without validating the supplied URL, an attacker can hijack the network connection and control the request schema by supplying ldap://jar:// or file:// instead of https://. Furthermore, the POST method allows an attacker to force the application to send a crafted request to an unexpected destination.

In certain situations, with carefully a formulated URL, an attacker might be able to:

  • Read server configurations such as metadata.
  • Connect to internal services like http-enabled databases.
  • Perform POST requests to an internal service that isn’t intended to be exposed.

 Important

User-controlled data shouldn’t be trusted. Validate all input and ensure that the request is being sent to the expected destination.

You should enforce an allowlist or blocklist (like IP addresses and host names).

Correct user input validation can protect your application from a few OWASP Top 10 items.

Code review notes

Once again, you were reminded of the importance of input validation. Luckily, .NET has built-in  methods for input and configuration validation.

To summarize, prevention from SSRF attacks in your .NET applications might involve:

  • Validating user input and only allowing expected values.
  • Using an allowlist with approved domains and protocols for network communication.

dynamics 365 field service training courses malaysi

Security logging and monitoring

How do you detect if you’re breached? How can you determine what steps the attacker took to penetrate your system?

Without sufficient logging and monitoring, you can’t detect breaches. Logging and monitoring give you an opportunity to stop an attacker in their tracks. Telemetry, logging, and monitoring enables digital forensics and post-mortem after a breach. Logging and monitoring are essential components in ensuring that you can detect any suspicious activity in close to real time, or diagnosed after the fact.

More importantly, collecting this data is useless without actively reviewing it or having alerting rules in place.

Make sure to sanitize the data to prevent from over-logging or storing sensitive information as logs.

Establish effective monitoring and alerting mechanisms. Ensure that sign in and access-control failures are logged with sufficient user context for identifying suspicious or malicious accounts. Take advantage of different logging levels (Info, Warning, Error, and so on) and log destinations. Avoid server-side error details from ever reaching client side, which can result in leaking your system’s implementation details.

 Important

Don’t leave access to your logs unprotected.

Logging and monitoring allow teams to stop an attack before more damage can be done.

Make sure you have answers to the following questions:

  • Is any logging configured, and what can be logged?
  • Who viewed or downloaded a specific file?
  • Have any incorrect authentication attempts occurred?
  • Who logged in recently?
  • Have authentication events happened at unexpected times or for unexpected locations (Microsoft Entra Conditional Access)?

.NET comes with a LoggerFactory, which is in Microsoft.Extensions.Logging.

Code review notes

In our scenario, your new DevOps team can prevent security logging and monitoring failures in their .NET applications by:

  • Using a centralized logging framework (such as NLog) or service (such as Application Insights). ASP.NET Core provides native logging capabilities through that you can easily add to your solutions.
  • Log all relevant security events such as authentication failures, authorization failures, and input validation failures.
  • Monitor logs for anomalies and alerts using automation.
  • Perform dynamic application security testing (for example, with OWASP ZAP Scan, GitHub Actions, or Azure DevOps Pipeline tasks).

dynamics 365 customer service training courses malaysia

Software and data integrity failures

With the increasing complexity of developed applications, you should avoid making assumptions related to software updates, critical data, and CI/CD pipelines without verifying integrity. Chances are your application relies upon plugins, libraries, or modules from untrusted sources or repositories.

 Tip

Software Bill of Materials (SBOM), is a software security and software supply chain risk-management record that helps identify a piece of software’s individual dependencies and components.

Software and data integrity failures can be connected to code and infrastructure that doesn’t protect against integrity violations. An application that relies upon plugins, libraries, or modules from untrusted sources or repositories can be at risk. An insecure CI/CD pipeline can introduce the potential for unauthorized access, malicious code, or system compromise. Attackers could potentially upload their own updates to be distributed and run on all installations. Objects or data encoded into a modifiable structure are vulnerable to insecure deserialization, as well.

Perhaps you recall the high-profile SolarWinds cyberattack by a nation-state from 2020. The attackers managed to hide added malicious code among a genuine product codebase.  They carefully planted a backdoor for hosting malicious code.

Naming the class containing malicious code OrionImprovementBusinessLayer was deliberate, not only to blend in with the rest of the code, but also to fool the software developers or anyone auditing the binaries. That class and many of the methods it uses can be found in other Orion software libraries, even thematically fitting with the code found within those libraries.

The company that develops the software had secure build processes and updated integrity processes. For several months, the firm distributed a highly targeted malicious update to more than 18,000 organizations, of which around 100 or so were affected.

Many applications now include autoupdate functionality, where updates are downloaded without sufficient integrity verification and applied to the previously trusted application. Supply-chain verification suggests depending only on vetted and verified libraries and components.

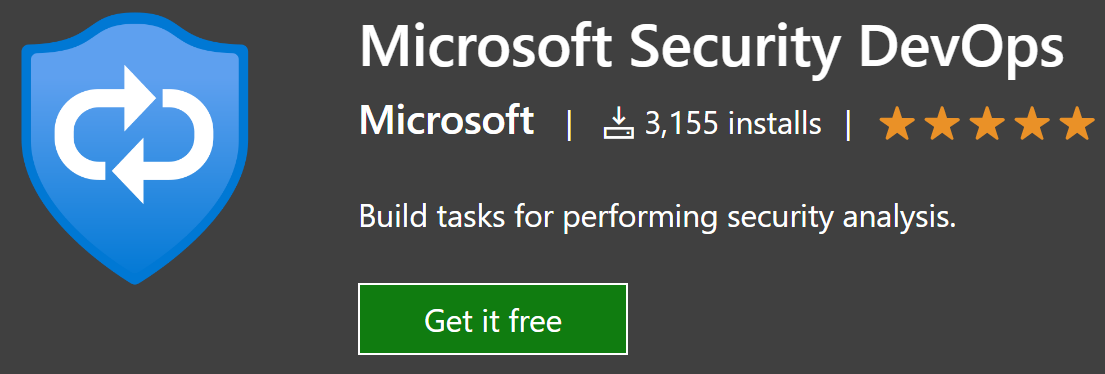
Screenshot of Microsoft Defender for DevOps extension.

Use automation when possible. Explore free and vendor offerings for CI/CD integrated security tooling; for example, Defender for DevOps, which brings credential, dependency, and static analysis scanning to your workflow.

Code review notes

As you and your team adopt secure CI/CD practices, you want to make sure that:

  • Your application only depends on properly vetted and verified dependencies, components, and repositories.
  • You take advantage of CI/CI automation workflows (for example,  to validate your supply-chain security review dependency graph.
  • Your code reviews focus on the security aspects of the codebase.

certification training courses malaysia

Identification and authentication failures

The identification and authentication failures category covers weaknesses in confirming a user’s identity, authentication, and session management in protection against authentication-related attacks.

As we discussed earlier, authentication is a process in which a user provides credentials that are then compared to credentials stored by the identity provider. If the credentials match, users authenticate successfully, and can then perform actions that they’re authorized for. Authorization refers to the process that determines what a user is allowed to do.

There are many techniques attackers use to exploit broken authentication. The result can be temporary or permanent information leaks or account hijacking.

 Tip

 best practices to ensure Multifactor Authentication, Zero Trust, and established Design Requirements are in place.

You should adequately protect and correctly implement operations related to user identity, authentication, or session management.

Luckily, the contains features to help you secure your apps and prevent security breaches. For example, the ASP.NET Model-View Controller (MVC) framework has a built-in helper method, which can add antiforgery tokens to your Razor pages:

razorCopy

@using (Html.BeginForm("Manage", "Account")) {
    @Html.AntiForgeryToken()
}

Cross-site scripting is a common attack technique. Cross-site scripting works by tricking your application into inserting a <script> tag into your rendered page, or by inserting an On* event into an element. Never put untrusted data into your HTML input. Untrusted data is any data that an attacker can control. HTML form inputs, query strings, HTTP headers, and even data sourced from a database might enable an attacker to breach your database even if they can’t breach your application.

Before putting untrusted data into a URL query string, ensure its URL is encoded. HTML encoding takes characters such as < and changes them into a safe form like &lt. Don’t make authorization decisions based on the state of the UI, but only from the component state. Consider using Content Security Policy (CSP) to protect against cross-site scripting attacks.

Code review notes

As part of your code review, you decided to analyze the Cross-Origin Resource Sharing (CORS) configuration of your app. The same-origin policy is a browser security feature that prevents a web page from making requests to a different domain than the one that served the web page, preventing man-in-the-middle attacks.

Your review showed you that confirming the user’s identity, authentication, and session management is critical to protecting against authentication–related attacks.

The Microsoft Authentication Library (MSAL) enables developers to acquire security tokens from the Microsoft identity platform to authenticate users and access-secured web APIs. You can use it to provide secure access to Microsoft Graph, other Microsoft APIs, third-party web APIs, or your own web API. MSAL supports many different application architectures and platforms including .NET, JavaScript, Java, Python, Android, and iOS.

dell emc training courses malaysia