This type of vulnerability occurs when you don’t know all the versions of all the components you use, and if the software is vulnerable, unsupported, or out of date.
Understanding the risks you inherit through dependencies helps improve the overall security of the codebase.
Important
Know what your digital components and dependencies are (bill of materials) for the project.
Whenever possible, keep the operating system, container images, frameworks, and individual project dependencies up to date. Remove unused dependencies, unnecessary features, components, files, and documentation.
For example, Microsoft keeps the .NET framework up to date with the Windows Update service.
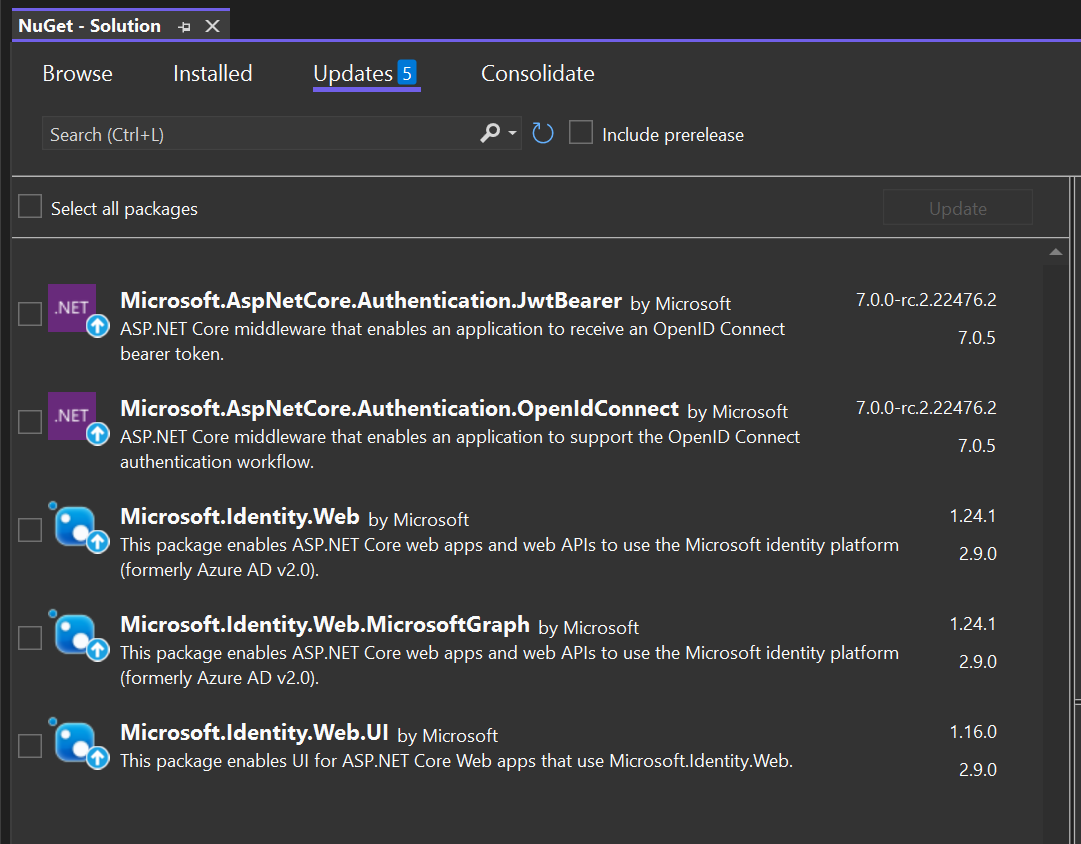
Individual components and dependencies can be kept up-to-date using the NuGet package manager, enabling .NET developers to create, share, and consume .NET libraries.
Most modern integrated development environments (IDEs) streamline update processes. Visual Studio informs developers about updates available to the dependencies across the entire solution.
Code review notes
To prevent vulnerable and outdated components in .NET applications, you should remove any unused or unnecessary components from your application.
Plan and schedule regular updates of your product’s components.
Manually monitoring sources like Common Vulnerability and Exposures (CVE) and National Vulnerability Database (NVD) for vulnerabilities in the components you use is tedious and time consuming. Apply automation and tooling, like GitHub Dependabot version updates or Snyk to keep up with dependency updates and security risks.
Highly configurable and distributed software, along with supporting services and tooling, introduces complexity. Increased complexity also increases the attack surface by introducing more components that should be secured. Security misconfigurations can occur when an application is missing the appropriate security hardening across any part of the application stack. It can manifest itself by reusing passwords or improperly configuring permissions on cloud services.
Security hardening
The application might be vulnerable if it’s missing a rigorous, repeatable application security configuration process.
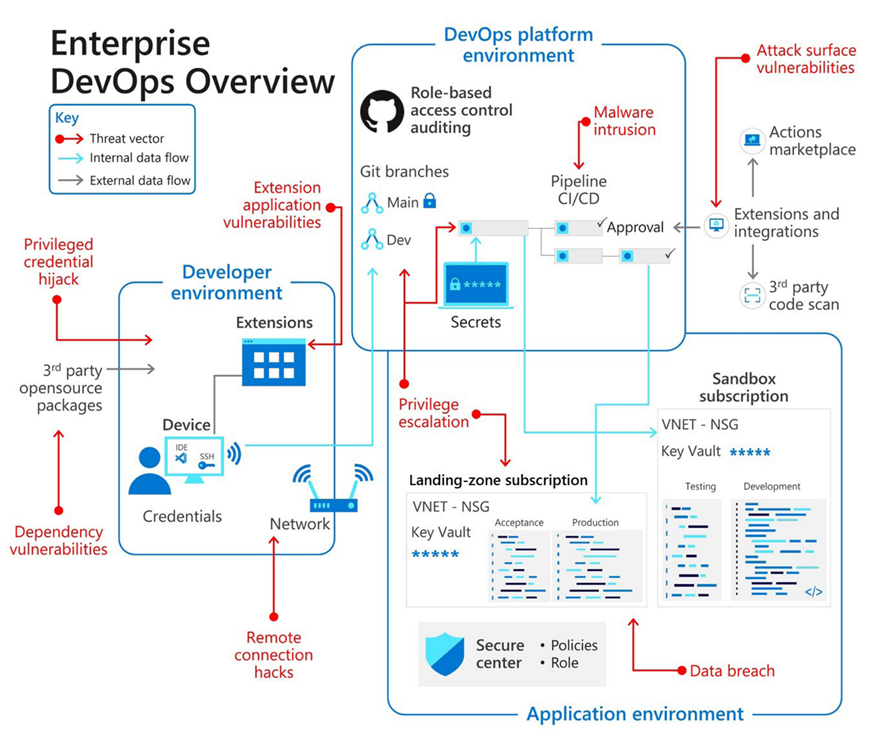
The following image shows a typical enterprise-scale application with supporting DevOps process. Here, security misconfiguration can apply to how you protect developer workstations, handle app secrets in your application, protect the CI/CD process, and so on.
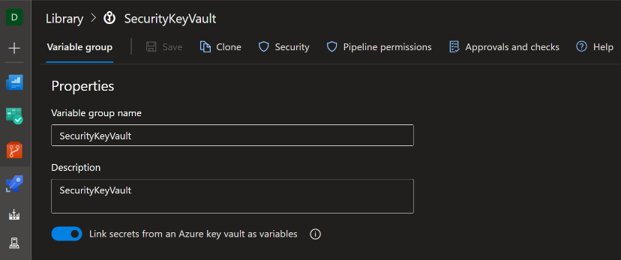
Security misconfiguration can manifest itself in many places, from web.config or appsettings.json settings, a database account, connectivity, or Internet Information Services (IIS) configurations. The automation workflows and cloud hosting can be misconfigured or abused too. A CI/CD system could be storing plain-text environment credentials for release. A cloud environment could be using managed shared admin accounts instead of following the least-privileged principle. In the world of Microsoft cloud, Azure role-based access control offers granular control over permissions granted to users and cloud services.
The preceding example demonstrates one of many native integrations between Azure DevOps and Azure Cloud, where Azure DevOps Library is linked with Azure KeyVault to securely access secret pipeline parameters.
Secret values should never be found in a codebase. The same practice applies to infrastructure as code (IaC) release workflows and CI/CD services themselves.
As the new addition to the team, be on the lookout for default accounts and their passwords being enabled and unchanged. Use secure settings for your application servers, frameworks, libraries, and databases. As you familiarize yourself with your team’s codebase, take this opportunity to remove any unused features, components, accounts, or services from your applications.
Code review notes
As you review the code, configuration, and deployment settings, you notice a separate set of credentials and configuration for development, QA, and production environments. Your web app takes advantage of Azure KeyVault for storing and rotating secrets like connection strings and API keys. You also notice a lack of any Dynamic Application Security Testing (DAST) pipeline tasks that can help with detecting misconfigurations. You’re planning to explore Azure Marketplace for potential tools.
Security is everyone’s responsibility; shared between the cloud provider and you, application developers and architects.
So far, you focused on unwanted coding errors leading to security flaws; that is, implementation issues surrounding user authenticating, data encryption, and so on. Insecure design is different from insecure implementation. Insecure design has more to do with risks related to design and architectural flaws. A secure implementation might have an insecure design, which still renders an application vulnerable to attacks and exploits.
Exercise assume breach mentality: minimize the blast radius for breaches and prevent lateral movement by segmenting access by network, user, devices, and application awareness. Verify all sessions are encrypted end-to-end. Use analytics to get visibility, drive threat detection, and improve defenses. Authenticate and authorize based on all available data points. User identity, location, device health, service, or workload are some common data points.
You might be familiar with the term shift left. Most often, the term refers to testing your application early on during the application lifecycle to ensure high quality. Shift left also applies to considering security before you write a single line of code. A few activities to employ early on in the design process could include reviewing secure design patterns and principles, using reference architectures, and performing threat modeling.
Let’s discuss the latter in more detail. Threat modeling is an essential part of DevSecOps, because it informs your security design process and helps find vulnerabilities in your application. While it does fall under DevSecOps, it also sits neatly under education too.
You can use threat modeling to help mitigate threats from the early stages of application design.
Whenever an application’s design or code is changed, you should run the threat modeling process again. In this way, your model reflects the new state of the application, and you can identify any new threats that emerged from the changes. It’s an iterative process, performed throughout the software development lifecycle.
Important
Threat modeling is a process to understand security threats to a system, determine risks from those threats, and establish appropriate mitigations.
Making threat modeling part of the application design phase helps bake security into the design from the start. Threat modeling goes beyond the design stage, and you can perform it at every stage of the Secure Development Lifecycle.
Design review notes Here, you focused your attention on the overall system architecture and design. Insecure design flows target systems as a whole, and not its codebase.
Security shouldn’t be an afterthought. How you protect your system’s configuration secrets, handle customer data, and implement logging should be considered early on in the project lifecycle. A perfect implementation can’t fix an insecure design.
After conversations with your team, you better understood the functional and nonfunctional security requirements. You also learned about the bug bar, a technique to help classify and prioritize security vulnerabilities based on their severity and potential impact.
As your new team adopts DevOps and Secure DevOps practices in an ongoing effort, you want to think of security as early and quickly as possible by shifting security considerations left.
When you’re contributing to your team’s codebase, consider the following techniques that can address insecure design:
Least privilege principle: Granting enough permissions to a user or service to successfully perform an operation. Attack surface reduction: Limit and control what’s visible to external users. Zero Trust principle: Never trust, always verify explicitly. Defense in Depth: Layered and tiered security approach. Threat Modeling: Understand how data flows through your system.
The injection category describes instances when an application accepts data as input and processes it as instruction instead of as data.
Let’s consider how your team’s application handles input data.
.NET provides built-in capabilities for data annotation and validation. The attributes from the System.ComponentModel.DataAnnotations namespace can decode your data model to provide the necessary validation functionality. Email, phone, credit card, or date validators are only a few examples of the built-in validators that can spare you the effort of writing and maintaining custom code.
C#
Copy using System.ComponentModel.DataAnnotations;
public class ExampleModel { [Required] [StringLength(10, ErrorMessage = “Name is too long.”)] public string? Name { get; set; }
} SQL injection Injection attacks can take many forms; for example, SQL or command injection.
The following statement is a simple example of SQL injection, where username in an unsanitized query input parameter:
SQL
Copy string sql = “SELECT * FROM users WHERE name = ‘” + username + “‘;”; In absence of user input validation, a malicious actor could supplement a genuine user name for a crafted part of a SQL statement a’;DROP TABLE users;– resulting in a change of query intentions:
SQL
Copy SELECT * FROM Users WHERE name = ‘a’;DROP TABLE users;– As a result, the table containing user information is removed from the database. In a similar way, you can craft statements to extract data before data table deletion.
File input validation In client-server scenarios, make sure the input is validated on both the client and the server side. Additionally, if validation passes on the server, process the form and send a success status code (200 – OK). However, if validation fails, return a failure status code (400 – Bad Request) and the field validation errors. Validation details from the server might give the malicious actor more insights on how your app logic works if they’re displayed on the client side.
Input validation also includes the way you handle file uploads. Consider an ASP.NET Blazor component handling user file uploads. The component checks for correctness before uploading the file to Azure Blob Storage. It includes extension and maximum file size inspection, and overrides the supplied filename with a random name.
C#
Copy
@code {
private string[] permittedExtensions = { ".txt", ".pdf" };
private long maxFileSize = 1024 * 15;

private async void LoadFile(InputFileChangeEventArgs e)
{
    if (e.File != null)
    {
        if (e.File.Size == 0 || e.File.Size > maxFileSize)
        {
            // log error
        }
        else
        {
            var ext = Path.GetExtension(e.File.Name).ToLowerInvariant();

            if (string.IsNullOrEmpty(ext) || !permittedExtensions.Contains(ext))
            {
                var trustedFileNameForFileStorage = Path.GetRandomFileName();

                await new BlobContainerClient("connection", "blob").UploadBlobAsync(trustedFileNameForFileStorage, e.File.OpenReadStream());
            }
        }
    }
}
} Important
Neutralize or verify user input in your application. Always verify that input is safe, legitimate, and in the correct format.
Code review notes After your review, you noticed that your team uses Entity Framework Core (Object-Relational Mapping (ORM)) as the glue between the C# code and the database. Simply using ORM eliminates the need to write your own SQL queries and prevents SQL injection.
You also noticed that every user input, uploaded file, or form entry field is always validated. Sanitizing and normalizing user input is a must.
As a golden rule, you should ensure validation is performed whenever you’re processing user input. Never assume any user data input as safe to process until proven otherwise.
You decided, as an exercise, to check if your web app is correctly validating user input by typing in javascript:alert(‘HACKED’)
Cryptographic failures are failures related to cryptography, or the lack thereof, that often leads to exposing sensitive data or compromising your system. Implementation mistakes often cause unexpected cryptographic errors.
First, let’s begin by distinguishing between encoding, encryption, and hashing in general programming terms.
Encoding a value converts the data to a different format for storage, transmission, compression, or decompression. Encoding helps transmit data in a channel, such as base 64 encoding over HTTP, but it doesn’t provide security. It changes a value’s format, but it doesn’t protect the value from detection. Encryption is a reversible operation that translates text into what might seem like a random and meaningless cypher. To decrypt the value, an encryption key is needed. Hashing is a one-way operation of mapping input data into fixed-size values (value hash). There’s no way to reverse hash a value. Warning
Avoid writing your own cryptographic algorithms. Instead, use the strong cryptographic algorithms .NET provides.
The .NET framework provides you with all the tools you need out of the box, including encryption, hashing, and random-number generation.
Your web applications deal with user accounts and data, but how do you securely encrypt a secret, generate a password hash, or create a temporary password in your app? To answer this question, let’s explore a couple of examples of what the System.Security.Cryptography namespace has to offer.
Encryption To securely encrypt a value like a string or integer, you can use symmetric or asymmetric encryption. To encrypt data with a symmetric-key algorithm, you can use the Advanced Encryption Standard (AES). In the next example, we create a new instance of the Aes class and use it to generate a new key and initialization vector (IV). We use the AES to encrypt any type of managed stream. The stream is then wrapped with CryptoStream.
C#
Copy Aes aes = Aes.Create(); CryptoStream cryptStream = new CryptoStream(fileStream, aes.CreateEncryptor(aes.Key, aes.VI), CryptoStreamMode. Write); Hashing Hashing is a one-way operation. When you’re using a hashing function to hash nonunique inputs such as passwords, use a salt value added to the original value before hashing.
C#
Copy public static byte[] HashPassword256(string password) { System.Security.Cryptography.SHA256 mySHA256 = System.Security.Cryptography.SHA256.Create(); var encoding = new System.Text.UnicodeEncoding(); return mySHA256.ComputeHash(encoding.GetBytes(password)); } Random numbers Temporary password or access codes are intended to be unique per user. You can achieve this uniqueness by introducing random-character generation, and it’s worth noting how the randomness is achieved. You might be familiar with the System.Random class. System.Random is a deterministic pseudo-random sequence generator. It’s predictable and seeded only from the system clock, which means it’s guessable. As a matter of fact, Microsoft Learn documentation explicitly states that you shouldn’t use it for generating passwords. To generate a cryptographically secure random number that’s suitable for creating a random password, you should use a RandomNumberGenerator instance.
C#
Copy var randomNumberGenerator = System.Security.Cryptography.RandomNumberGenerator.Create(); By using RandomNumberGenerator, you can eliminate the chances of two or more users ending up with the same token or password when they must be unique.
Code review notes You don’t want to unnecessarily store any sensitive data in your system. If you do, make sure you encrypt all data in transit and at rest with the use of HTTPS and TLS/SSL. After studying your team’s codebase, you can now make the distinction between encryption, encoding, and hashing. No crypto keys were checked into the source code repository. You’re planning to research security-scanning tools to run as part of the CI/CD process to prevent sensitive data and secrets from getting into the repository.
Your app has a built-in mechanism for resetting user passwords. You noticed System.Security Cryptography.RandomNumberGenerator being used in favor of System.Random.
Recall that you recently joined a team at an IT software company who tasked you with conducting a design and code review of the team-owned codebases. As you onboard to your new team and explore the codebase, you discover an ASP.NET Blazor web project. With OWASP Top 10 in mind, you set off on a deep dive into the code with your security lenses on.
You start at the top of the OWASP Top 10 list with #1: Broken Access Control. This category refers to incidents where a user who shouldn’t have permission to access that data viewed confidential information.
Built-in framework security capabilities .NET has built-in authentication and session management, so there’s no need to implement your own. Let’s consider a ASP.NET Core controller. A controller without any authorization attributes treats each request the same way without applying any security checks. By decorating controller actions or the controller itself with Authorize (user must be signed in and authenticated) or AllowAnonymous (any unauthenticated caller can invoke method) attributes, you gain control over what’s publicly accessible and which functionality is for authorized users only.
Plain ASP.NET controller with no authorization attributes, no access restrictions applied.
C#
Copy public class AccountController : Controller { public ActionResult Login() { }
public ActionResult Logout() { }
public ActionResult GetCitizenTaxId() { } } Controller with authorization attributes, based on policy or role assignments. Authorized caller is able to invoke the GetCitizenTaxId method.
C#
Copy [Authorize(Policy=””, Roles=””] public class AccountController : Controller { [AllowAnonymous] public ActionResult Login() { }
public ActionResult Logout() { }
[Authorize] public ActionResult GetCitizenTaxId() { } } Similarly, the ASP.NET Minimal API supports the attribute decoration (Lambda HTTP get method with [Authorize] attribute), policy (AdminsOnly), and claim (admin) authorization, as shown here:
C#
Copy var builder = WebApplication.CreateBuilder(args);
// Policy and claim use below builder.Services.AddAuthorization(o => o.AddPolicy(“AdminsOnly”, b => b.RequireClaim(“admin”, “true”))); var connectionString = builder.Configuration.GetConnectionString(“DefaultConnection”); builder.Services.AddDbContext(options => options.UseSqlServer(connectionString)); builder.Services.AddDefaultIdentity(options => options.SignIn.RequireConfirmedAccount = true).AddEntityFrameworkStores(); var app = builder.Build(); app.UseAuthorization();
// Attribute use below app.MapGet(“/auth”, [Authorize] () => “This endpoint requires authorization.”); app.MapGet(“/”, () => “This endpoint doesn’t require authorization.”); app.Run(); Your application’s user interface should also reflect the user’s authentication (the user is who they say they are) and authorization state (whether the user is allowed to access certain information). Here, too, you’re covered by the OWASP Top 10 framework. ASP.NET Blazor’s razor syntax supports conditionally displayed components depending on authorization status. The AutorizeView component selectively displays UI content based on user’s authorized status.
C#
Copy
Hello, @context.User.Identity.Name!
You can only see this content if you are authorized. Authorized Only Button
Authentication Failure!
You are not signed in.
@code {
private void SecureMethod()
{
    // Invoked only upon successful authorization
}
} The SecureMethod is accessible once the user is authorized. Because the AutorizeView component can validate against roles or policies, only the role claims for either the admin or superuser roles would have the button.
Code review notes You and your team considered the broken access control risk and implemented Claims-based and Policy-based authorization in your web app. Knowing the app gets deployed to Azure, other best practices include:
Authorizing users on all externally facing endpoints. Using role-based and policy-based authorization in your application. ASP.NET has many ways to authorize a user based on their role or claims.
As application complexity increases, so does the effort of making it secure. Modern applications, in contrast with single-project monolith legacy applications, have many dependencies. Including, external libraries, services for hosting, building, and releasing, to name a few. None of these services are simple “plug and play” affairs. Developers need to understand them and know how to configure and implement the flows and processes securely in their own code.
Security is everyone’s job. Developers, service engineers, and program and product managers must understand security basics and know how to build security into software and services.
Training and education is an essential stage in the security-application development lifecycle (or SDL). For developers, OWASP Top 10 is a great start.
From a software-development point of view, your team’s security journey should begin by familiarizing yourself with the concepts behind each item on the Top 10 list.
Although security is everyone’s job, it’s important to remember that not everyone needs to be a security expert nor strive to become a proficient penetration tester. However, ensuring everyone understands the attacker’s perspective, their goals, and the art of the possible, helps capture the attention of everyone and raise the collective knowledge bar.
What is OWASP?
The is a global nonprofit organization focused on improving software security.
OWASP periodically releases a list of 10 categories of application-security vulnerabilities. Each category covers different areas of application and information security. Their mission is to make software security visible so that individuals and organizations can make informed decisions.
The list is curated and ordered according to the severity of reported vulnerabilities, industry suggested guidelines, and attack probability.
OWASP Top 10
The OWASP Top 10 (2023) is a standard awareness document for developers and web application security. It represents a broad consensus about the most critical security risks to web applications.
This module explores the OWASP TOP 10: 2021 edition. It covers the most common security weaknesses and how you as an app developer or architect can reduce the risk of security bugs infecting your systems. This module introduces techniques, tools, and best practices that can improve your product’s security posture.
Threat landscape Implementing secure and high-quality software can be challenging. Cyber threats are on the rise, like malware, exploits, and many others. Attacks happen by exploiting vulnerabilities in an application. A vulnerability is just an unintended flaw or weakness in that application. How data is processed and stored and how services are configured are examples of where a vulnerability could be introduced.
News stories about a company being hacked or data being stolen and posted on the dark web are now common. According to the 2021 Identity Theft Resource Center (ITRC) Annual Data Breach Report, the cost of a data breach increased by nearly 10% between 2020 and 2021. Data breaches are increasing and getting more costly.
Important
The National Institute of Standards and Technology (NIST) defines Software Vulnerability as “a security flaw, glitch, or weakness found in software code that could be exploited by an attacker (threat source).”
The world of application security Every developer writes their code to the best of their ability. As authors of ever more complex systems, we’re responsible for the success of our products, and part of that success is providing our customers with a secure and reliable solution. The security development lifecycle starts with training. Understanding the risk associated and discussed in OWASP Top 10 is a great start.
Application Security, often referred to as AppSec, is the process of finding, fixing, and preventing security vulnerabilities at the application level.
Image source
AppSec logically falls under the wider context of Information Security (InfoSec), a term covering the protection of information and systems from unauthorized access, use, disruption, or destruction. InfoSec also covers areas like network security, intrusion detection, digital forensics, and governance, risk, and compliance, for example.
The Security Development Lifecycle (SDL) consists of a set of practices that support security assurance and compliance requirements. The SDL helps developers build more secure software by reducing the number and severity of vulnerabilities in software.
DevSecOps is an evolution in the way development organizations approach security by introducing a security-first mindset culture and automating security into every phase of the software-development lifecycle from design to delivery.
Meet the team Suppose you’re joining a new IT company with an established team working on a legacy software. Your team’s main focus is maintaining, supporting, and developing new features of a rich web application that customers all around the world use. The website and its underlying infrastructure were only recently migrated to Microsoft Azure cloud.
The team you’re part of has a mix of talent, including early-career and seasoned enterprise developers.
In the past, a manual-release process slowed down your team and proved to be unreliable, error-prone, and heavy on manual interaction. As part of its cloud migration, your team is looking to adopt modern CI/CD automation.
The company has yet to fully grasp the concepts behind secure DevOps practices. With new personnel onboarded, the company is looking to spread security best practices not only within the team, but the company as a whole.
Your team lead asked you to conduct design and code reviews of a team-owned codebase, with extra attention paid to the solution’s security aspects. You discovered the OWASP report, which you plan to use as a reference in your code review.
Discover the most common software vulnerabilities according to OWASP and different techniques of writing more secure code. Prevent from security bugs creeping into your codebase following security best practices.
Learning objectives
By the end of this module, you’re able to:
Describe what OWASP Top 10 is.
Identify potential security vulnerabilities in your software.
Always validate user input in your applications.
Prerequisites
Basic knowledge of .NET and C# at the intermediate level
Basic knowledge of web development with ASP.NET at the beginner level, including controllers and Razor syntax
Familiarity with software development and release cycle at the beginner level
Basic concepts and terminology of cloud hosting and security tooling, including automation and
Blazor includes layouts to make it easy to code common user interface (UI) elements that appear on many pages in your app.
Suppose you’re working in the pizza delivery company’s website and you created the content for most of the main pages as a set of Blazor components. You want to ensure that these pages have the same branding, navigation menus, and footer section. However, you don’t want to have to copy and paste that code into multiple files.
Here, you learn how to use layout components in Blazor to render common HTML on multiple pages.
Note
The code blocks in this unit are illustrative examples. You write your own code in the next unit.
What are Blazor layouts?
In most websites, the arrangement of UI elements is shared across multiple pages. For example, there might be a branded banner at the top of the page, the main site navigation links down the left side, and a legal disclaimer at the bottom. After you code these common UI elements in one page, it’s tedious to copy and paste them into the code for all the other pages. Worse, if there’s a change later, such as a new major section of the site to link to or a site rebrand, you have to make the same changes repeat in all the individual components. Instead, use a layout component to streamline and reuse common UI elements.
A layout component in Blazor is one that shares its rendered markup with all the components that reference it. You place common UI elements like navigation menus, branding, and footers on the layout. Then you reference that layout from multiple other components. When the page is rendered, unique elements such as the details of the requested pizza, come from the referencing component. But, common elements come from the layout. You only have to code the common UI elements once, in the layout. Then if you need to rebrand the site, or make some other change, you only have to correct the layout. The change automatically applies to all the referencing components.
Code a Blazor layout
A Blazor layout is a specific type of component, so writing a Blazor layout is a similar task to writing other components to render UI in your app. For example, you use @code block and many directives in the same way. Layouts are defined in files with a .razor extension. The file is often stored in the Shared folder within your app, but you can choose to store it in any location that’s accessible to the components that use it.
Two requirements are unique to Blazor layout components:
You must inherit the LayoutComponentBase class.
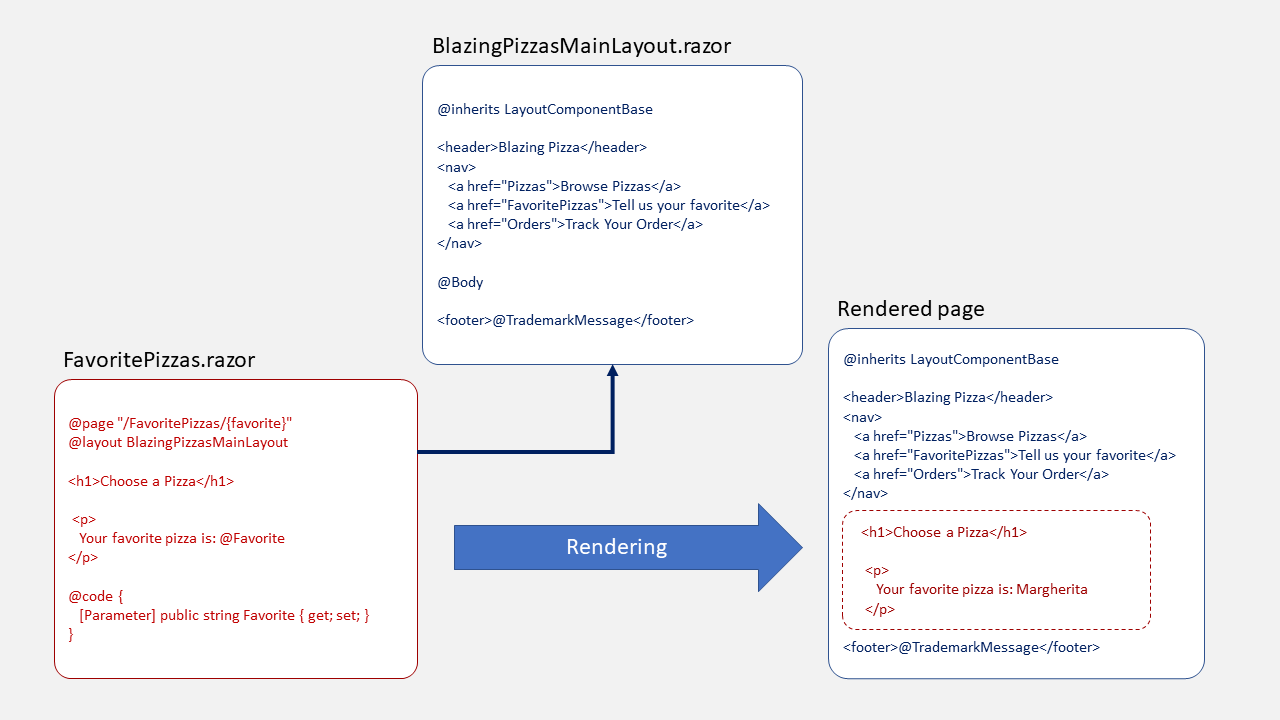
You must include the @Body directive in the location where you want to render the content of the components that you’re referencing.
Layout components don’t include a @page directive because they don’t handle requests directly and shouldn’t have a route created for them. Instead, the referencing components use the @page directive.
If you created your Blazor app from a Blazor project template, the app’s default layout is the Shared/MainLayout.razor component.
Use a layout in a Blazor component
To use a layout from another component, add the @layout directive with the name of the layout to apply. The component’s HTML is rendered in the position of the @Body directive.
razorCopy
@page "/FavoritePizzas/{favorite}"
@layout BlazingPizzasMainLayout

<h1>Choose a Pizza</h1>

<p>Your favorite pizza is: @Favorite</p>

@code {
    [Parameter]
    public string Favorite { get; set; }
}
This diagram illustrates how a component and a layout are combined to render the final HTML:
If you want to apply a template to all the Blazor components in a folder, you can use the _Imports.razor file as a shortcut. When the Blazor compiler finds this file, it includes its directives in all the components in the folder automatically. This technique removes the need to add the @layout directive to every component and applies to components in the same folder as the _Imports.razor file and all its subfolders.
Important
Don’t add a @layout directive to the _Imports.razor file in the root folder of your project because it results in an infinite loop of layouts.
If you want to apply a default layout to every component in all folders of your web app, you can do so in the App.razor component, where you configure the Router component, as you learned in unit 2. In the <RouteView> tag, use the DefaultLayout attribute.
razorCopy
<Router AppAssembly="@typeof(Program).Assembly">
    <Found Context="routeData">
        <RouteView RouteData="@routeData" DefaultLayout="@typeof(BlazingPizzasMainLayout)" />
    </Found>
    <NotFound>
        <p>Sorry, there's nothing at this address.</p>
    </NotFound>
</Router>
Components that have a layout specified in their own @layout directive, or in an _Imports.razor file, override this default layout setting.