Explore how route parameters affect your Blazor app’s routing

So far, in this Blazor module, you saw how to use parts of the URI to route requests to the right component. You can also use route parameters to intercept other parts of the URI and access them in your code.

Suppose you’re working on the pizza delivery company’s website, and you’re routing pizza requests to the Pizzas.razor component. Now, you want to get the user’s favorite pizza from the URI and use it to display information about other pizzas they might like.

Here, you learn how to use route parameters to specify parts of the URL to process in your code.

 Note

The code blocks in this unit are illustrative examples. You write your own code in the next unit.

Route parameters

Earlier in this module, you learned how parts of the URI that the user requests can be used to route the request to the right component. You often want to use other parts of the URI as a value in your rendered page. For example, suppose the user requests:

http://www.contoso.com/favoritepizza/hawaiian

By using the @page directive, you saw how to route this request to, for example, the FavoritePizza.razor component. Now you want to make use of the value hawaiian in your component. To obtain this value, you can declare it as a route parameter.

Use the @page directive to specify the parts of the URI that are passed to the component as route parameters. In your component’s code, you can obtain the value of a route parameter in the same way as you would obtain the value of a component parameter:

razorCopy

@page "/FavoritePizzas/{favorite}"

<h1>Choose a Pizza</h1>

<p>Your favorite pizza is: @Favorite</p>

@code {
    [Parameter]
    public string Favorite { get; set; }
}

The preceding code uses braces in the @page directive to specify the route parameter and give it a name.

 Note

Component parameters are values sent from a parent component to a child component. In the parent, you specify the component parameter value as an attribute of the child component’s tag. Route parameters are specified differently. They’re specified as part of the URI. Behind the scenes, the Blazor router intercepts these values and sends them to the component as component values, which is why you can access them in the same way. Route parameters are case insensitive and are forwarded to a component parameter with the same name.

Optional route parameters

In the preceding example, the {favorite} parameter is required. To make the route parameter optional, use a question mark:

razorCopy

@page "/FavoritePizzas/{favorite?}"

<h1>Choose a Pizza</h1>

<p>Your favorite pizza is: @Favorite</p>

@code {
    [Parameter]
    public string Favorite { get; set; }
    
    protected override void OnInitialized()
    {
        Favorite ??= "Fiorentina";
    }
}

It’s a good idea to set a default value for the optional parameter. In the preceding example, the default value for the Favorite parameter is set in the OnInitialized method.

 Note

The OnInitialized method runs when users request the page for the first time. It doesn’t run if they request the same page with a different routing parameter. For example, if you expect users to go from http://www.contoso.com/favoritepizza/hawaiian to http://www.contoso.com/favoritepizza, set the default value in the OnParametersSet() method instead.

Route constraints

In the previous examples, the consequence of requesting the URI http://www.contoso.com/favoritepizza/2 is the nonsensical message “Your favorite pizza is: 2”. In other cases, type mismatches like that one might cause an exception and display an error to the user. Consider specifying a type for the route parameter:

razorCopy

@page "/FavoritePizza/{preferredsize:int}"

<h1>Choose a Pizza</h1>

<p>Your favorite pizza size is: @FavoriteSize inches.</p>

@code {
    [Parameter]
    public int FavoriteSize { get; set; }
}

In this example, if the user requests http://www.contoso.com/favoritepizza/margherita, there’s no match with the preceding component. As a result, the request is routed elsewhere. If the user requests http://www.contoso.com/favoritepizza/12, there’s a route match and the component displays the message Your favorite pizza size is: 12 inches. A specific type provided for the route parameter like this is called a, route constraint. You can use these other types in a constraint:

ConstraintExampleExample matches
bool{vegan:bool}http://www.contoso.com/pizzas/true
datetime{birthdate:datetime}http://www.contoso.com/customers/1995-12-12
decimal{maxprice:decimal}http://www.contoso.com/pizzas/15.00
double{weight:double}http://www.contoso.com/pizzas/1.234
float{weight:float}http://www.contoso.com/pizzas/1.564
guid{pizza id:guid}http://www.contoso.com/pizzas/CD2C1638-1638-72D5-1638-DEADBEEF1638
long{totals ales:long}http://www.contoso.com/pizzas/568192454

Set a catch-all route parameter

Consider the following component from earlier in this unit:

razorCopy

@page "/FavoritePizza/{favorite}"

<h1>Choose a Pizza</h1>

<p>Your favorite pizza is: @Favorite</p>

@code {
    [Parameter]
    public string Favorite { get; set; }
}

Now suppose the user tries to specify two favorites by requesting the URI http://www.contoso.com/favoritepizza/margherita/hawaiian. The page displays the message Your favorite pizza is: margherita and ignores the subfolder hawaiian. You can change this behavior by using a catch-all route parameter, which captures paths across multiple URI folder boundaries (forward slashes). Prefix an asterisk (*) to the route parameter name to make the route parameter catch-all:

razorCopy

@page "/FavoritePizza/{*favorites}"

<h1>Choose a Pizza</h1>

<p>Your favorite pizzas are: @Favorites</p>

@code {
    [Parameter]
    public string Favorites { get; set; }
}

With the same request URI, the page now displays the message Your favorite pizzas are: margherita/hawaiian.
oracle linux administration training courses malaysia

Use the Blazor router component to control your app’s navigation

Blazor’s routing system provides flexible options for ensuring that user requests reach a component that can handle them and return information the user wants.

Suppose you’re working on the pizza delivery company’s website. You want to set up the site so that requests for pizza details and custom-topping details are both handled by the same component. You completed this phase, but your testing shows that the topping requests are receiving an error message. You need to fix this problem.

Here, you learn how to configure routes in Blazor by using the @page directive.

 Note

The code blocks in this unit are illustrative examples. You write your own code in the next unit.

Using route templates

When the user makes a request for a page from your web app, they can specify what they want to see with information in the URI. For example:

http://www.contoso.com/pizzas/margherita?extratopping=pineapple

After the protocol and website address, this URI indicates that the user wants to know about margherita pizzas. Also, the query string after the question mark shows that they’re interested in an extra topping of pineapple. In Blazor, you use routing to ensure that each request is sent to the component that can best respond. You also use routing to ensure that the component has all the information it needs to display what the user wants. In this case, you might want to send the request to the Pizzas component and for that component to display a margherita pizza with information about adding pineapple to it.

Blazor routes requests with a specialized component called the Router component. The component is configured in App.razor like this:

razorCopy

<Router AppAssembly="@typeof(Program).Assembly">
    <Found Context="routeData">
        <RouteView RouteData="@routeData" DefaultLayout="@typeof(MainLayout)" />
    </Found>
    <NotFound>
        <p>Sorry, we haven't found any pizzas here.</p>
    </NotFound>
</Router>

When the app starts, Blazor checks the AppAssembly attribute to find out which assembly it should scan. It scans that assembly for components that have the RouteAttribute present. Blazor uses these values to compile a RouteData object that specifies how requests are routed to components. When you code the app, you use the @page directive in each component to fix the RouteAttribute.

In the preceding code, the <Found> tag specifies the component that handles the routing at runtime: the RouteView component. This component receives the RouteData object and any parameters from the URI or query string. It then renders the specified component and its layout. You can use the <Found> tag to specify a default layout, which is used when the selected component doesn’t specify a layout with the @layout directive. You learn more about layouts later in this module.

In the <Router> component, you can also specify what is returned to the user when there isn’t a matching route, by using the <NotFound> tag. The preceding example returns a single <p> paragraph, but you can render more complex HTML. For example, it might include a link to the home page or a contact page for site administrators.

Using the @page directive

In a Blazor component, the @page directive specifies that the component should handle requests directly. You can specify a RouteAttribute in the @page directive by passing it as a string. For example, this attribute specifies that the page handles requests to the /Pizzas route:

razorCopy

@page "/Pizzas"

If you want to specify more than one route to the component, use two or more @page directives, like in this example:

razorCopy

@page "/Pizzas"
@page "/CustomPizzas"

Obtaining location information and navigating with NavigationManager

Suppose you write a component to handle a URI that the user requests, such as http://www.contoso.com/pizzas/margherita/?extratopping=pineapple.

When you write a component, you might need access to navigation information like:

  • The current full URI, such as http://www.contoso.com/pizzas/margherita?extratopping=pineapple.
  • The base URI, such as http://www.contoso.com/.
  • The base relative path, such as pizzas/margherita.
  • The query string, such as ?extratopping=pineapple.

You can use a NavigationManager object to obtain all these values. You must inject the object into the component and then you can access its properties. This code uses the NavigationManager object to obtain the website’s base URI and then uses it to set a link to the home page:

razorCopy

@page "/pizzas"
@inject NavigationManager NavManager

<h1>Buy a Pizza</h1>

<p>I want to order a: @PizzaName</p>

<a href=@HomePageURI>Home Page</a>

@code {
    [Parameter]
    public string PizzaName { get; set; }
    
    public string HomePageURI { get; set; }
    
    protected override void OnInitialized()
    {
        HomePageURI = NavManager.BaseUri;
    }
}

To access the query string, you must parse the full URI. To execute this parse, use the QueryHelpers class from the Microsoft.AspNetCore.WebUtilities assembly:

razorCopy

@page "/pizzas"
@using Microsoft.AspNetCore.WebUtilities
@inject NavigationManager NavManager

<h1>Buy a Pizza</h1>

<p>I want to order a: @PizzaName</p>

<p>I want to add this topping: @ToppingName</p>

@code {
    [Parameter]
    public string PizzaName { get; set; }
    
    private string ToppingName { get; set; }
    
    protected override void OnInitialized()
    {
        var uri = NavManager.ToAbsoluteUri(NavManager.Uri);
        if (QueryHelpers.ParseQuery(uri.Query).TryGetValue("extratopping", out var extraTopping))
        {
            ToppingName = System.Convert.ToString(extraTopping);
        }
    }
}

With the preceding component deployed, if a user requested the URI http://www.contoso.com/pizzas?extratopping=Pineapple, they would see the message “I want to add this topping: Pineapple” in the rendered page.

You can also use the NavigationManager object to send your users to another component in code by calling the NavigationManager.NavigateTo() method:

razorCopy

@page "/pizzas/{pizzaname}"
@inject NavigationManager NavManager

<h1>Buy a Pizza</h1>

<p>I want to order a: @PizzaName</p>

<button class="btn" @onclick="NavigateToPaymentPage">
    Buy this pizza!
</button>

@code {
    [Parameter]
    public string PizzaName { get; set; }
    
    private void NavigateToPaymentPage()
    {
        NavManager.NavigateTo("buypizza");
    }
}

 Note

The string that you pass to the NavigateTo() method is the absolute or relative URI where you want to send the user. Make sure that you have a component set up at that address. In the preceding code, a component with the @page "/buypizza" directive handles this route.

In one of the previous examples, code was used to obtain the NavigationManager.BaseUri value and use it to set the href attribute of an <a> tag to the home page. In Blazor, use the NavLink component to render <a> tags because it toggles an active CSS class when the link’s href attribute matches the current URL. By styling the active class, you can make it clear to the user which navigation link is for the current page.

When you use NavLink, the home page link example looks like the following code:

razorCopy

@page "/pizzas"
@inject NavigationManager NavManager

<h1>Buy a Pizza</h1>

<p>I want to order a: @PizzaName</p>

<NavLink href=@HomePageURI Match="NavLinkMatch.All">Home Page</NavLink>

@code {
    [Parameter]
    public string PizzaName { get; set; }
    
    public string HomePageURI { get; set; }
    
    protected override void OnInitialized()
    {
        HomePageURI = NavManager.BaseUri;
    }
}

The Match attribute in the NavLink component is used to manage when the link is highlighted. There are two options:

  • NavLinkMatch.All: When you use this value, the link is only highlighted as the active link when its href matches the entire current URL.
  • NavLinkMatch.Prefix: When you use this value, the link is highlighted as active when its href matches the first part of the current URL. Suppose, for example, that you had the link <NavLink href="pizzas" Match="NavLinkMatch.Prefix">. This link would be highlighted as active when the current URL was http://www.contoso.com/pizzas and for any location within that URL, such as http://www.contoso.com/pizzas/formaggio. This behavior can help the user understand which section of the website they’re currently viewing.

oracle peoplesoft training courses malaysia

Introduction

Blazor creates interactive web applications using .NET that allow you to share app logic on both the server and client side, without the complexity of managing client-side JavaScript libraries.

Suppose that a pizza delivery firm hired you to modernize its customer-facing website. You already built pages for them that display pizzas and enable customers to customize the toppings for their pizzas. Now, you want to add ordering pages and improve the app’s navigation. You also want to ensure a consistent layout across the app to ensure that customers can find what they’re looking for easily.

In this module, you learn about how to route customers through the app by using the @page directive, Blazor routing, and the NavLink component. With navigation working, you focus on how to reduce duplicate code by adding layouts to the app.

Learning objectives

At the end of this module, you’re able to:

  • Improve your Blazor app’s navigation by using the router component and NavLinks.
  • Enhance functionality with route parameters.
  • Reduce duplicate code by using layouts in your Blazor app.

oracle siebel crm training courses malaysia

Use pages, routing, and layouts to improve Blazor navigation

Learn how to manage request routing by using the @page directive, Blazor routing, NavLink, and NavMenu components. Increase an app’s flexibility by adding routing parameters in your Blazor components. Use layouts to improve your app by reducing duplicate code.

Learning objectives

By the end of this module, you’re able to:

  • Improve your Blazor app’s navigation by using the router component and NavLinks.
  • Enhance functionality with route parameters.
  • Reduce duplicate code by using layouts in your Blazor app.

Prerequisites

  • Basic knowledge of web app concepts
  • C# .NET experience at a beginner level
  • Local installations of the .NET SDK and Visual Studio Code
  • C# extension for Visual Studio Code
  • Experience with using the command line
  • Knowledge of Blazor components

php programming training courses malaysia

Access platform features in Blazor Hybrid

We’re building hybrid apps with .NET, which means we have access to all of the .NET class libraries. In addition to these APIs, building Blazor Hybrid apps with .NET MAUI not only allows you to deploy to multiple platforms, it also allows access to each platform’s native APIs. This means that if you need to integrate platform capabilities of iOS, Android, macOS, or Windows, you can do it all in C#. You can access these APIs directly from your Blazor components or create shared .NET MAUI class libraries.

Platform integration

Each platform that .NET MAUI supports offers unique operating system and platform APIs that you can access from C#. .NET MAUI provides cross-platform APIs to access much of this platform functionality, which includes access to sensors, accessing information about the device on which an app is running, checking network connectivity, storing data securely, and initiating browser-based authentication flows.

.NET MAUI separates these cross-platform APIs into different areas of functionality:

  • Application Model: App functionality, including app actions, application information, opening the browser, opening URIs, opening maps, handling permissions, and version tracking
  • Communication: Access to contacts, email, networking, phone dialer, sms messaging, and web authentication
  • Device Features: Information and access to battery, display info, device info, sensors, flashlight, geocoding, geolocation, haptic feedback, and vibration
  • Media: Including media picker, screenshots, text to speech, and unit converters
  • Sharing: Including access to the clipboard and sharing files or text to other applications
  • Storage: APIs for picking files, file system helpers, preferences, and secure storage

If an application needed to detect if internet access was available on the device, it could use the Connectivity API in Microsoft.Maui.Networking:

C#Copy

var accessType = Connectivity.Current.NetworkAccess;
if (accessType is NetworkAccess.Internet)
{
    // Connection to internet is available
}

Access platform APIs

.NET MAUI platform-specifics allow you to consume specific functionality that’s only available on a specific platform. For more information, reference 

In situations where .NET MAUI doesn’t provide any APIs for accessing specific platform APIs, you can write your own code to access the required platform APIs. For more information, reference 

You can invoke platform code from cross-platform code by using conditional compilation to target different platforms.

The following example shows the DeviceOrientation enumeration, which you use to specify your device orientation:

C#Copy

namespace InvokePlatformCodeDemos.Services
{
    public enum DeviceOrientation
    {
        Undefined,
        Landscape,
        Portrait
    }
}

Retrieving your device orientation requires writing platform code, which you can accomplish by writing a method that uses conditional compilation to target different platforms:

C#Copy

#if ANDROID
using Android.Content;
using Android.Views;
using Android.Runtime;
#elif IOS
using UIKit;
#endif

using InvokePlatformCodeDemos.Services;

namespace InvokePlatformCodeDemos.Services.ConditionalCompilation
{
    public class DeviceOrientationService
    {
        public DeviceOrientation GetOrientation()
        {
#if ANDROID
            IWindowManager windowManager = Android.App.Application.Context.GetSystemService(Context.WindowService).JavaCast<IWindowManager>();
            SurfaceOrientation orientation = windowManager.DefaultDisplay.Rotation;
            bool isLandscape = orientation == SurfaceOrientation.Rotation90 || orientation == SurfaceOrientation.Rotation270;
            return isLandscape ? DeviceOrientation.Landscape : DeviceOrientation.Portrait;
#elif IOS
            UIInterfaceOrientation orientation = UIApplication.SharedApplication.StatusBarOrientation;
            bool isPortrait = orientation == UIInterfaceOrientation.Portrait || orientation == UIInterfaceOrientation.PortraitUpsideDown;
            return isPortrait ? DeviceOrientation.Portrait : DeviceOrientation.Landscape;
#else
            return DeviceOrientation.Undefined;
#endif
        }
    }
}

A .NET MAUI app project contains a Platforms folder, with each child folder representing a platform that .NET MAUI can target. Each target-platform folder contains platform-specific code that starts the app on that platform, plus any another platform code you add. At build time, the build system only includes the code from each folder when building for that specific platform. For example, when you build for Android, the files in the Platforms > Android folder are built into the app package, but the files in the other Platforms folders aren’t. This approach uses a feature called multitargeting to target multiple platforms from a single project. You can combine multitargeting with partial classes and partial methods to invoke platform functionality from cross-platform code.

In the next exercise, we’ll use a combination of .NET APIs and .NET MAUI APIs to save and load our todo list.

power bi training courses malaysia

Data binding and events in Blazor Hybrid

You’ve defined the UI for your web app. Now, let’s explore how to add logic to the app. In a Blazor app, you can add C# code in separate .cs files or inline in your Razor components.

C# inline in components

It’s common practice to mix HTML and C# in a single Razor component file. For simple components with lighter code requirements, this approach works well. To add code into a Razor file, you’ll use Razor syntax.

What are Razor directives?

Razor directives are component markup used to add C# inline with HTML. With directives, developers can define single statements, methods, or larger code blocks.

Code directives

Code directives should be familiar to developers who have used Razor in MVC or Pages.

You can use @expression() to add a C# statement inline with HTML. If you require more code, use the @code directive to add multiple statements enclosed by parentheses.

You can also add an @functions section to the template for methods and properties. They’re added to the top of the generated class, where the document can reference them.

Razor data binding

Within Razor components, you can bind HTML elements to data in C# fields, properties, and Razor expression values. Data binding allows two-way synchronization between HTML and your code.

Data is pushed from HTML to .NET when a component is rendered. Components render themselves after event-handler code executes, which is why property updates are reflected in the UI immediately after an event handler is triggered.

Use @bind markup to bind a C# variable to an HTML input. You’ll see an example of data binding in the next exercise.

prince2 certification training courses malaysia

Razor components in Blazor Hybrid

Now that you have your development environment set up, let’s explore the structure of a Blazor Hybrid project and learn how to add new pages.

What is Razor?

Razor is a markup syntax for embedding .NET based code into webpages. The Razor syntax consists of HTML, C#, and Razor-specific syntax that typically begins with an @ character. Files containing Razor generally have a .cshtml file extension (used in server-side development with Razor Pages and MVC) or a .razor extension when used in files. Razor syntax is similar to the templating engines of various JavaScript single-page application (SPA) frameworks such as Angular, React, VueJs, and Svelte.

What are Razor components?

A Razor component defines a reusable piece of web UI. Blazor components are analogous to React and Angular components in SPA frameworks.

If you explore the project, you’ll see various Razor components defined in .razor files.

At compile time, each Razor component is built into a .NET class. The class includes common UI elements like state, rendering logic, lifecycle methods, and event handlers.

Try the Counter

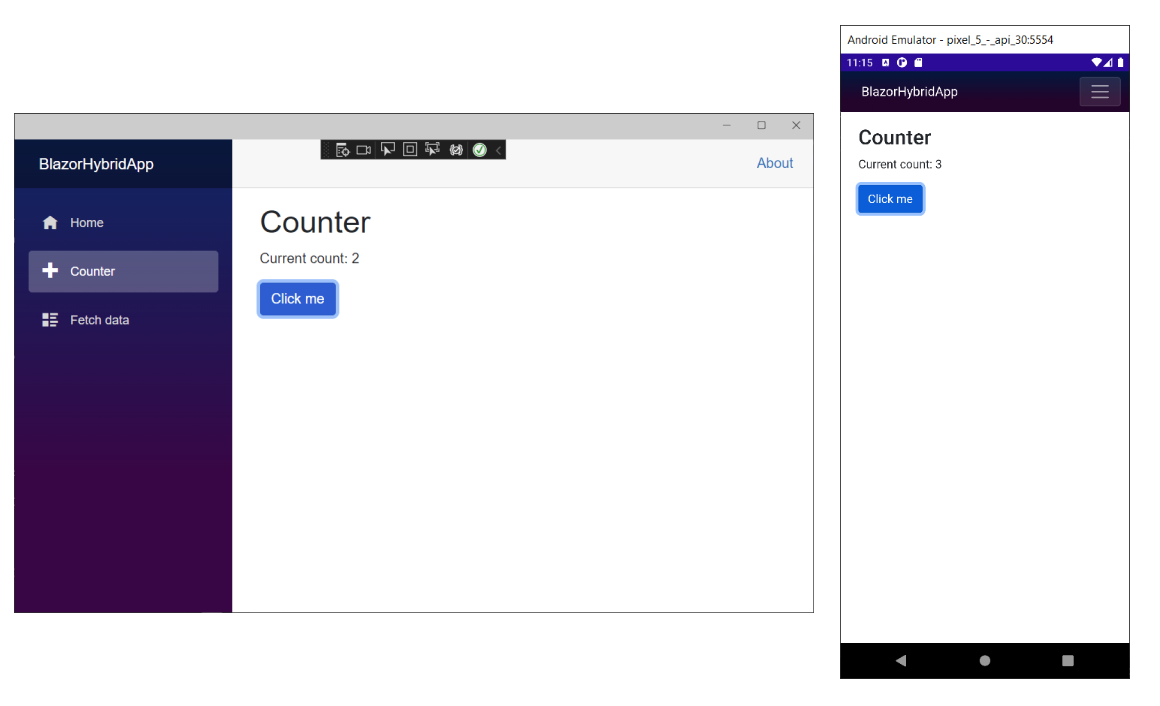
In the running app, navigate to the counter page by selecting the Counter tab in the sidebar on the left. The following page should then be displayed:

Screenshot that shows the counter tab.

Select the Click me button to increment the count without a page refresh. Incrementing a counter in a webpage normally requires writing JavaScript, but with Blazor you can use C#.

You can find the implementation of the Counter component at Components/Pages/Counter.razor.

razorCopy

@page "/counter"

<h1>Counter</h1>

<p role="status">Current count: @currentCount</p>

<button class="btn btn-primary" @onclick="IncrementCount">Click me</button>

@code {
    private int currentCount = 0;

    private void IncrementCount()
    {
        currentCount++;
    }
}

A request for /counter in the browser, as specified by the @page directive at the top, causes the Counter component to render its content.

Each time you select the Click me button:

  • The onclick event is fired.
  • The IncrementCount method is called.
  • The currentCount variable is incremented.
  • The component is rendered to show the updated count.

python programming training courses malaysia

What is Blazor Hybrid?

Companies that build web apps and client apps commonly hire developers for different roles. Some developers create back-end, server-side logic. Some build client-side web apps. Others build native-client apps for mobile and desktop platforms. These developers often use different development languages and technologies.

C# and .NET are popular choices for building server-side logic. Client-side web apps are often built with web UI frameworks using JavaScript. When it comes to native-client apps for desktop and mobile, there are several options available, including many for .NET and C#. Using multiple languages and toolsets requires multiple sets of skills and often requires two separate teams. Also, code to transfer and represent data must be built in both languages and kept in sync. Blazor Hybrid can simplify your development team’s tasks, code, and processes by allowing you to use your existing skills and code in building web applications in C# and .NET to build native-client applications using these same technologies.

In this unit, you’ll start with an introduction to Blazor Hybrid, .NET MAUI, and Razor Components.

What is Blazor?

Blazor apps are composed of reusable web UI components built using C#, HTML, and CSS. With Blazor, developers can build client and server code with C#. They can also share code and libraries with the front-end client code and back-end logic. Using C# for all code simplifies sharing data between the front end and back end, enables code reuse to accelerate development, and reduces maintenance.

What is Blazor Hybrid?

Blazor Hybrid allows developers to blend desktop and mobile native client frameworks with .NET and Blazor.

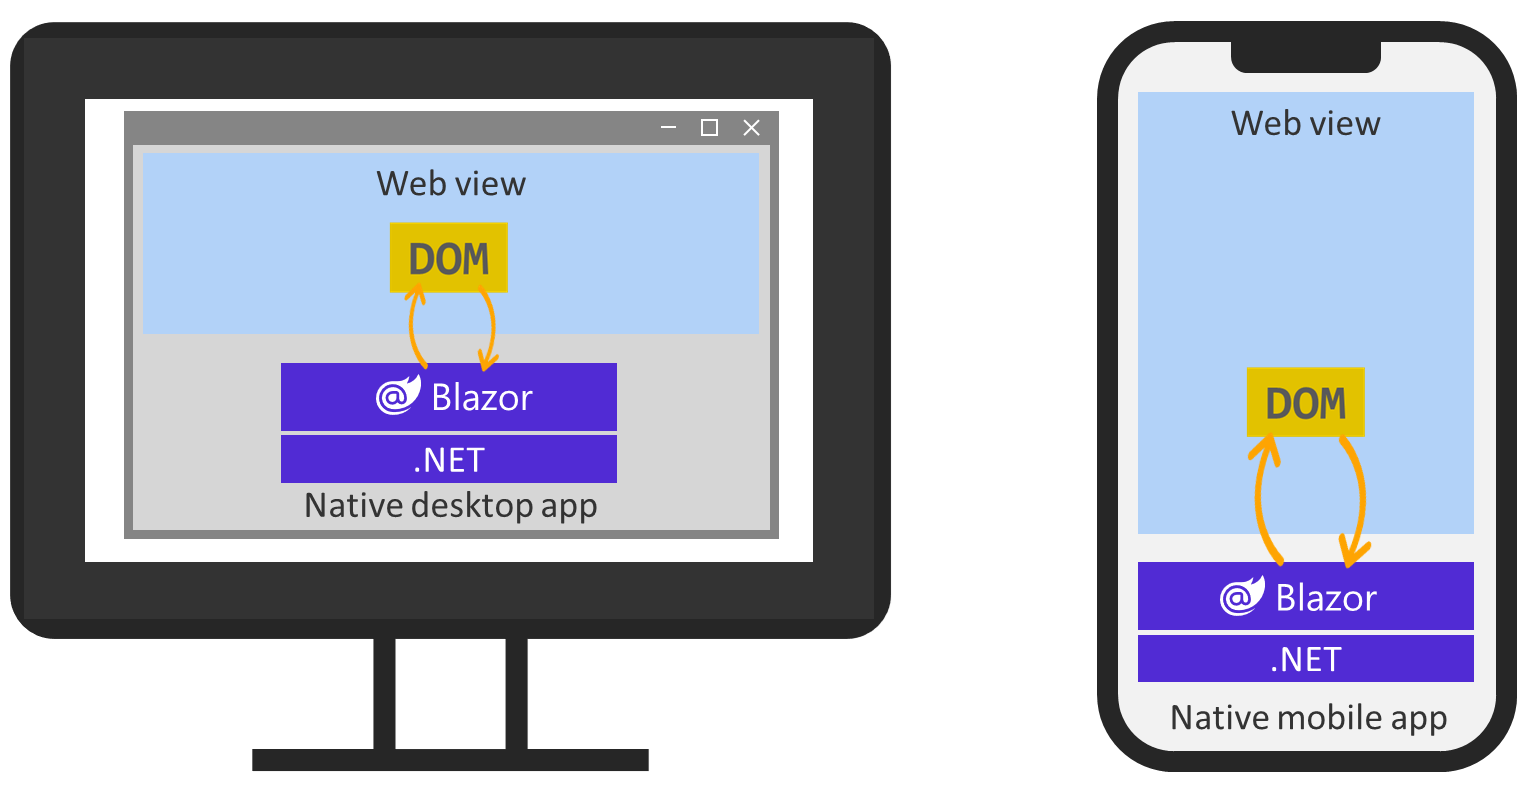
In a Blazor Hybrid app, Razor components run natively on the device. Components render to an embedded Web View control through a local interop channel. Components don’t run in the browser, and WebAssembly isn’t involved. Razor components load and execute code quickly, and components have full access to the device’s native capabilities through the .NET platform.

Diagram that shows the Blazor Hybrid architecture.

What is .NET MAUI?

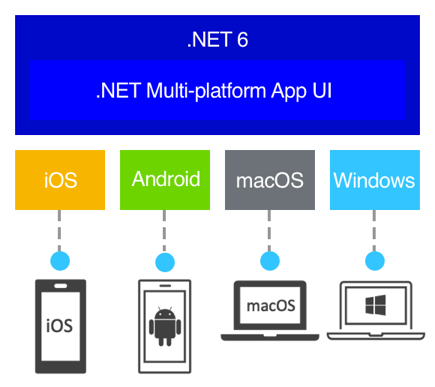
.NET Multi-platform App UI (.NET MAUI) is a cross-platform framework for creating native mobile and desktop apps with C# and XAML. Using .NET MAUI, you can develop apps that can run on Android, iOS, macOS, and Windows from a single shared codebase. One of the key aims of .NET MAUI is to allow you to implement as much of your app logic and UI layout as possible in a single codebase. .NET MAUI unifies Android, iOS, macOS, and Windows APIs into a single API that allows a write-once, run-anywhere developer experience, while additionally providing deep access to every aspect of each native platform.

Diagram that shows the .NET MAUI architecture.

Blazor Hybrid apps with .NET MAUI

Blazor Hybrid support is built into the .NET MAUI framework. .NET MAUI includes the BlazorWebView control, which permits rendering Razor components into an embedded Web View. By using .NET MAUI and Blazor together, you can reuse one set of web UI components across mobile, desktop, and web.

Blazor Hybrid development requirements

You can build Blazor Hybrid apps by using the latest version of Visual Studio 2022 . In this module, we’ll be using Visual Studio 2022 or Visual Studio Code to build our Blazor Hybrid application.

Whatever your development environment, you need to install the .NET MAUI workload to ensure the .NET 9.0 SDK and tools are available in Visual Studio. After installation, you’ll have everything you need to start building Blazor Hybrid apps. You’ll build your first Blazor Hybrid app in the next exercise.

red hat certified architect rhca malaysia

Introduction

Blazor lets C# developers use their skills to build web apps with C#. Blazor Hybrid allows developers to use Blazor web UI components (called Razor components) from within native mobile and desktop client apps. Blazor Hybrid apps use a “hybrid” of web and native client development.

Blazor Hybrid supports using Razor components with:

  • .NET MAUI (Multi-Platform User Interface)
  • Windows Forms (WinForms)
  • Windows Presentation Foundation (WPF)

Imagine you’re building a client-side web app and already have a team of .NET web developers. Also, imagine you want to deploy your app as a native multiplatform app across mobile and desktop platforms including iOS, Android, macOS, and Windows.

With Blazor, developers can build front-end and back-end logic for web apps with common languages, frameworks, and tools. With .NET MAUI, you can build multi-platform apps from a single project and access platform-specific source code and resources for mobile and desktop platforms. Combining these two technologies together with Blazor Hybrid, developers can build native-client and web apps that leverage shared UI components and logic. They can use Blazor Hybrid for the entire native application or parts of the native application.

Using the same language for front-end web apps, client apps, and back-end code can:

  • Accelerate app development.
  • Reduce the complexity of the build pipeline.
  • Simplify maintenance.
  • Let developers understand and work on both client-side and server-side code.

Learning objectives

In this module, you’ll:

  • Configure your local environment for Blazor Hybrid and .NET MAUI development with Visual Studio.
  • Create a new Blazor Hybrid project powered by .NET MAUI.
  • Add a Razor component to a Blazor Hybrid page.
  • Update logic in a Blazor Hybrid app.
  • Learn about event handling and data binding in Blazor components.
  • Use routing in a Blazor app.
  • Access platform features leveraging .NET MAUI.

red hat certified engineer rhce malaysia

Build a mobile and desktop app with Blazor Hybrid and .NET MAUI

Learn how to set up your development environment and build your first cross-platform hybrid app with Blazor, .NET MAUI, and C#.

Learning objectives

In this module, you will:

  • Configure your local environment for Blazor Hybrid development with Visual Studio.
  • Learn the basic architecture of a Blazor Hybrid app.
  • Create a new Blazor Hybrid project powered by .NET MAUI.
  • Add client-side logic to a Blazor Hybrid app.
  • Access platform features for mobile and desktop with .NET MAUI.
  • Deploy a Blazor Hybrid app from Visual Studio.

Prerequisites

  • Visual Studio 2022 with the .NET MAUI workload installed
  • Familiarity with C# and .NET
  • Basic knowledge of web app concepts

mysql database training courses malaysia