It’s important to be able to scale a web app for these reasons:
It enables the app to remain responsive during periods of high demand.
It helps to save you money by reducing the resources required when demand drops.
Azure App Service enables you to meet these goals by providing scale up and down, and scale in and out.
Imagine that you work for a large chain of hotels. You have a website that customers can visit to make bookings and to view the details of bookings that they previously made. At certain times of the year, the volume of traffic grows because customers are browsing hotels for summer vacations. At other times, traffic declines. These patterns are predictable.
In this module, you use Azure App Service to scale a web app to match planned seasonal throughput requirements and also meet demand during short-term peak events. This module also describes how to scale up a web app onto more powerful hardware to meet future requirements.
Learning objectives
In this module, you’ll:
Scale a web app in and out manually.
Scale a web app up and down.
Prerequisites
Navigate the Azure portal.
Use the Azure portal to create a new App Service web app.
Respond to periods of increased activity by incrementally increasing the resources available. Then decreasing these resources when activity drops to reduce costs.
Learning objectives
In this module, you’ll:
Scale a web app in and out manually.
Scale a web app up and down.
Prerequisites
Able to navigate the Azure portal.
Use the Azure portal to create a new App Service web app.
The purpose of a web application is to receive and respond to HTTP requests. A request is received, and then the server generates the appropriate response. Everything in ASP.NET Core is concerned with this request/response cycle.
When an ASP.NET Core app receives an HTTP request, it passes through a series of components to generate the response. These components are called middleware. Middleware can be thought of as a pipeline that the request flows through, and each middleware layer can run code before and after the next layer in the pipeline.
Middleware and delegates
Middleware is implemented as a delegate that takes a HttpContext object and returns a Task. The HttpContext object represents the current request and response. The delegate is a function that processes the request and response.
For example, consider the following code:
C#Copy
var builder = WebApplication.CreateBuilder(args);
var app = builder.Build();

app.Run(async context =>
{
    await context.Response.WriteAsync("Hello world!");
});

app.Run();
In the preceding code:
WebApplication.CreateBuilder(args) creates a new WebApplicationBuilder object.
builder.Build() creates a new WebApplication object.
The first app.Run() defines a delegate that takes a HttpContext object and returns a Task. The delegate writes “Hello world!” to the response.
The second app.Run() starts the app.
When the app receives an HTTP request, the delegate is called. The delegate writes “Hello world!” to the response and completes the request.
Chaining middleware
In most apps, you have multiple middleware components that run in sequence. The order in which you add middleware components to the pipeline is important. The components run in the order they were added.
Terminal and nonterminal middleware
Each middleware can be thought of as terminal or nonterminal. Nonterminal middleware processes the request and then calls the next middleware in the pipeline. Terminal middleware is the last middleware in the pipeline and doesn’t have a next middleware to call.
Delegates added with app.Use() can be terminal or nonterminal middleware. These delegates expect a HttpContext object and a RequestDelegate object as parameters. Typically the delegate includes await next.Invoke();. This passes control to the next middleware on the pipeline. Code before that line runs before the next middleware, and code after that line runs after the next middleware. A delegate added with app.Use() gets two opportunities to act on a request before the response is sent to the client; once before the response is generated by the terminal middleware, and again after the response is generated by the terminal middleware.
Delegates added with app.Run() are always terminal middleware. They don’t call the next middleware in the pipeline. They’re the last middleware component that runs. They only expect a HttpContext object as a parameter. app.Run() is a shortcut for adding terminal middleware.
Consider the following example:
C#Copy
var builder = WebApplication.CreateBuilder(args);
var app = builder.Build();

app.Use(async (context, next) =>
{
    await context.Response.WriteAsync("Hello from middleware 1. Passing to the next middleware!\r\n");

    // Call the next middleware in the pipeline
    await next.Invoke();

    await context.Response.WriteAsync("Hello from middleware 1 again!\r\n");
});

app.Run(async context =>
{
    await context.Response.WriteAsync("Hello from middleware 2!\r\n");
});

app.Run();
In the preceding code:
app.Use() defines a middleware component that:
Writes “Hello from middleware 1. Passing to the next middleware!” to the response.
Passes the request to the next middleware component in the pipeline and waits for it to complete with await next.Invoke().
After the next component in the pipeline completes, it writes “Hello from middleware 1 again!”
The first app.Run() defines a middleware component that writes “Hello from middleware 2!” to the response.
The second app.Run() starts the app.
At runtime, when a web browser sends a request to this app, the middleware components run in the order they were added to the pipeline. The app returns the following response:
OutputCopy
Hello from middleware 1. Passing to the next middleware!
Hello from middleware 2!
Hello from middleware 1 again!
Built-in middleware
ASP.NET Core provides a set of built-in middleware components that you can use to add common functionality to your app. In addition to the explicitly added middleware components, some middleware is implicitly added for you by default. For example, WebApplication.CreateBuilder() returns a WebApplicationBuilder that adds the developer exception page routing middleware, conditionally adds the authentication and authorization middleware if the related services are configured, and adds the endpoint routing middleware.
For example, consider the following Program.cs file:
C#Copy
var builder = WebApplication.CreateBuilder(args);

// Add services to the container.
builder.Services.AddRazorComponents()
    .AddInteractiveServerComponents();

var app = builder.Build();

// Configure the HTTP request pipeline.
if (!app.Environment.IsDevelopment())
{
    app.UseExceptionHandler("/Error", createScopeForErrors: true);
    // The default HSTS value is 30 days. You may want to change this for production scenarios, see https://aka.ms/aspnetcore-hsts.
    app.UseHsts();
}

app.UseHttpsRedirection();

app.UseAntiforgery();

app.MapStaticAssets();
app.MapRazorComponents<App>()
    .AddInteractiveServerRenderMode();

app.Run();
In the preceding code:
app.UseExceptionHandler() adds a middleware component that catches exceptions and returns an error page.
app.UseHsts() adds a middleware component that sets the Strict-Transport-Security header.
app.UseHttpsRedirection() adds a middleware component that redirects HTTP requests to HTTPS.
app.UseAntiforgery() adds a middleware component that prevents cross-site request forgery (CSRF) attacks.
app.MapStaticAssets() and app.MapRazorComponents<App>() map routes to endpoints, which are then handled by the endpoint routing middleware. The endpoint routing middleware is implicitly added by the WebApplicationBuilder.
There are many more built-in middleware components that you can use in your app depending on the type of app and your needs.
Tip
In this context, methods that start with Use are generally for mapping middleware. Methods that start with Map are generally for mapping endpoints.
When an ASP.NET Core app receives an HTTP request, it passes through a series of components that are responsible for processing the request and generating a response. These components are called middleware. ASP.NET Core includes a set of built-in middleware, and you can also create custom middleware to handle specialized requirements.
Example scenario
Suppose you’re an entry-level ASP.NET Core developer at a small company. Your team is building a new web app. The requirements include URL redirection, and real-time console output for monitoring purposes. Your team lead asked you to with implement the built-in middleware for URL redirection, and create a custom middleware component to log the request details.
What will we be doing?
In this module, you use the .NET SDK to create a boilerplate ASP.NET Core web application. After ensuring it runs correctly, you’ll implement the built-in UrlRewriter middleware to rewrite URLs in the app. You’ll then create a custom middleware component to log request details to the console.
What is the main goal?
By the end of this module, you’ll be able to implement built-in and custom middleware in an ASP.NET Core app. You’ll also understand how middleware components work together to process HTTP requests and generate responses.
Understand and implement middleware in an ASP.NET Core app. Use included middleware like HTTP logging and authentication. Create custom middleware to handle requests and responses.
Learning objectives
By the end of this module, you’ll be able to:
Describe the role of middleware in an ASP.NET Core app.
Use included middleware like HTTP logging and authentication.
Create custom middleware to handle requests and responses.
When you swap slots, you can precisely control the behavior and configuration of web apps.
Suppose you set up deployment slots for production and staging. You test a new version of your social media web app in the staging slot. Now it’s time to deploy that new version to production. You want to deploy the app smoothly and in the correct configuration.
Here, you learn the correct configuration to swap the web app into production.
Manage the configuration for a swap
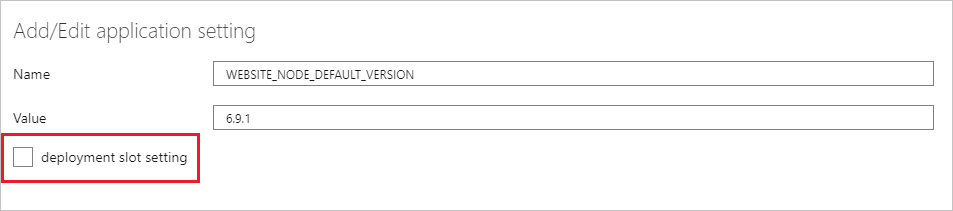
When you swap two slots, the app’s configuration travels to the new slot along with the app. You can override this behavior for individual application settings and configuration strings by configuring them as slot settings.
Suppose, for example, you have two databases. You use one for production and the other for acceptance testing. You always want the app version in the staging slot to use the testing database. The app version in the production slot should always use the production database. You can achieve this overall configuration by configuring the database connection string as a slot setting.
Configure slot settings
To view and configure settings for the swap, go to the web app resource and follow these steps:
On the Azure portal menu or from the Home page, select All resources, and select the deployment slot you want to configure.
Go to the Configuration pane.
On the Application settings tab, observe whether the settings you’re interested in contain a checkmark in the deployment slot setting field. To set or unset a checkmark on a given setting, select the setting’s pencil button to edit it, then toggle the deployment slot setting checkbox to the desired value, and select OK.
Select Save on the Configuration pane when you’re finished to save your settings.
Swap slots in the Azure portal
To swap two slots in the Azure portal:
On the Azure portal menu or from the Home page, select All resources, and go to any of the deployment slots for the web app, and select the Deployment Slots pane.
Select Swap.
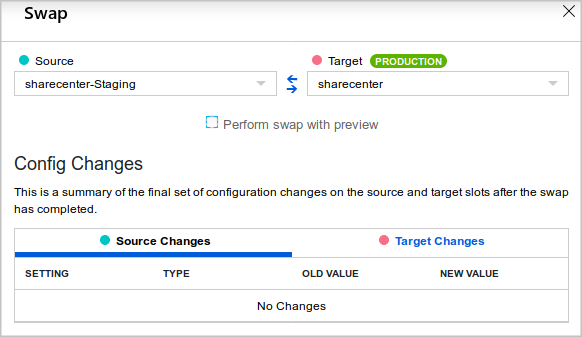
In the Swap dialog box, you can select the source and target slots, and see a summary of the settings to be applied to the swapped slots.
Understand the slot-swapping preview
When you swap slots, the settings in the target slot (typically the production slot) are applied to the app version in the source slot, before the hostnames are swapped. You might discover problems at this point. For example, if the database connection string is configured as a slot setting, the new version of the web app uses the existing production database. If you forgot to upgrade the database schema in the production database before the swap, you could see errors and exceptions when the new app version attempts to use the old schema.
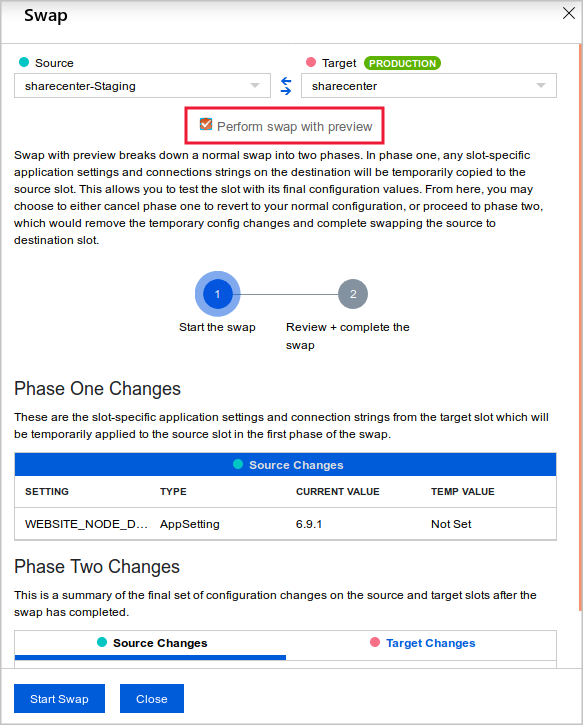
To help you discover problems before your app goes live into production, Azure App Service offers a swap-with-preview feature. When you choose this option, the swap proceeds in two phases:
Phase 1: Slot settings from the target slot are applied to the web app in the source slot. Azure then warms up the source slot. At this point, the swap operation pauses so you can test the app in the source slot to make sure it works with the target slot configuration. If you find no problems, begin the next phase.
Phase 2: The hostnames for the two sites are swapped. The version of the app now in the source slot receives its slot settings.
Important
Test your web app thoroughly while it’s in the staging slot. Eliminate code bugs and problems with nonslot settings. The swap-with-preview feature can only help you spot and eliminate problems caused by the production-slot settings. Make sure everything else is sound before you start any kind of swap into production.
Preview slot swapping
To use the swap-with-preview feature, select Perform swap with preview, review the settings, and then select Start Swap.
Follow the link to preview the new version of the site. In the preview, the slot settings from the destination slot are applied. If you want to continue, select Complete Swap.
Auto swap
Auto swap brings the zero-downtime and easy rollback benefits of swap-based deployment to automated deployment pipelines. When you configure a slot for auto swap, Azure automatically swaps it whenever you push code or content into that slot.
When you use auto swap, you can’t test the new app version in the staging slot before the swap. Auto swap mainly benefits users who want zero-downtime deployments and simple automated deployment pipelines.
If you want to be able to test before you swap, you need a more complex deployment pipeline that requests the slot swap itself. Alternatively, you can deploy to a separate slot dedicated for testing.
Note
Auto swap isn’t available in App Service on Linux.
Configure auto swap
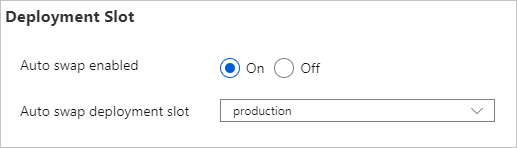
To configure auto swap for a slot, go to the Configuration > General settings pane for the slot in the Azure portal. Under Deployment Slot, set Auto swap enabled to On, select the target slot from the dropdown list, and then select Save on the top menu bar.
This option is only available on slots other than the production slot.
Organizations often need to run web apps in isolated environments to test them before deployment. They also need to deploy quickly and without affecting users.
Suppose you’re trying to decide whether to use slots as a streamlined way to deploy a web app in your social media system. You want to find out if deployment slots reduce downtime during deployments, if they ease rollbacks, and if you can set them up in Azure.
Here, you learn how deployment slots ease the testing and rollout of new code.
Use a deployment slot
Within a single Azure App Service web app, you can create multiple deployment slots. Each slot is a separate instance of that web app, and it has a separate hostname. You can deploy a different version of your web app into each slot.
One slot is the production slot. This slot is the web app that users see when they connect. Make sure that the app deployed to this slot is stable and well tested.
Use the other slots to host new versions of your web app. Against these instances, you can run tests such as integration tests, acceptance tests, and capacity tests. Fix any problems before you move the code to the production slot. The other deployment slots behave like their own App Service instances, so you can have confidence that your tests show you how the app runs in production.
After you’re satisfied with the test results for a new app version, deploy it by swapping its slot with the production slot. Unlike a code deployment, a slot swap is instantaneous. When you swap slots, the slot hostnames are exchanged, immediately sending production traffic to the new version of the app. When you use slot swaps to deploy, your app is never exposed to the public web in a partially deployed state.
If you find that, in spite of your careful testing, the new version has a problem, you can roll back the version by swapping the slots back.
Understand slots as separate Azure resources
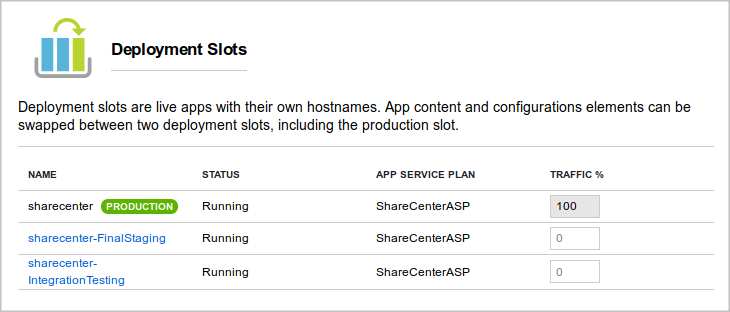
When you use more than one deployment slot for a web app, those slots are treated as separate instances of that web app. For example, they’re listed separately on the All resources page in the Azure portal. They each have their own URL. However, each slot shares the resources of the App Service plan, including virtual machine memory and CPU, and disk space.
Create deployment slots and tiers
Deployment slots are available only when your web app uses an App Service plan in the Standard, Premium, or Isolated tier. The following table shows the maximum number of slots you can create:
Tier
Maximum staging slots
Free
0
Shared
0
Basic
0
Standard
5
Premium
20
Isolated
20
Avoid a cold start during swaps
Many of the technologies that developers use to create web apps require final compilation and other actions on the server before they deliver a page to a user. Many of these tasks are completed when the app starts up and receives a request. For example, if you use ASP.NET to build your app, code is compiled and views are completed when the first user requests a page. Subsequent requests for that page receive a faster response, because the code is already compiled.
The initial delay is called a cold start. You can avoid a cold start by using slot swaps to deploy to production. When you swap a slot into production, you “warm up” the app because your action sends a request to the root of the site. The warm-up request ensures that all compilation and caching tasks finish. After the swap, the site responds as quickly as if it were deployed for days.
Create a deployment slot
Before you create a slot, make sure your web app is running in the Standard, Premium, or Isolated tier:
Open your web app in the Azure portal.
Select the Deployment Slots pane.
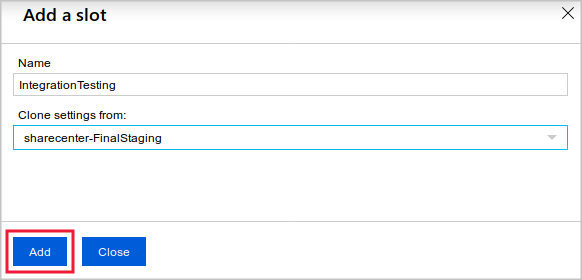
Select Add Slot.
Name the slot.
Choose whether to clone settings from another slot. If you choose to clone, settings are copied to your new slot from the slot you specify.
Note
Although you can clone settings to a new slot, you can’t clone content. New slots always begin with no content. You must deploy content by using Git or another deployment strategy. The clone operation copies the configuration to the new slot. After you clone the settings, the configuration of the two slots can be changed independently.
Select Add to create the new slot. You now have the new slot in the list on the Deployment Slots page. Select the slot to view its management pane.
Access a slot
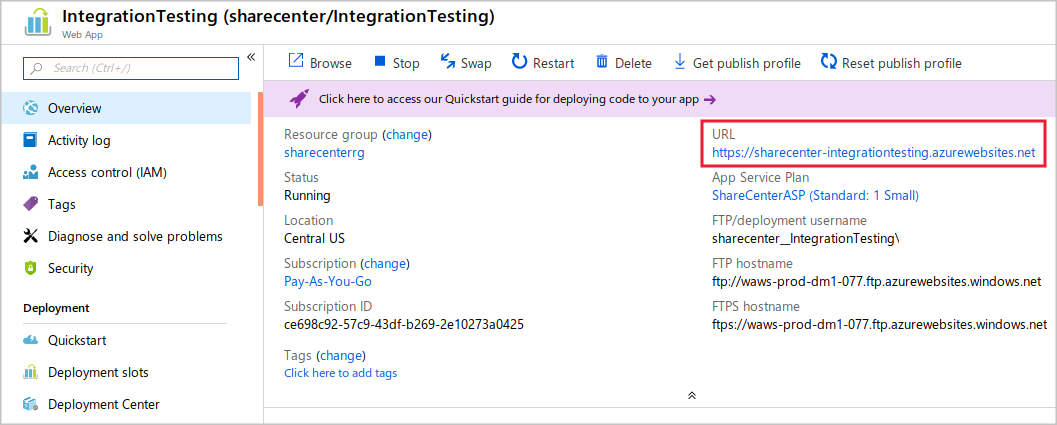
The new slot’s hostname is derived from the web app name and the name of the slot. You get this hostname when you select the slot on the Deployment Slots page:
You can deploy your code to the new slot the same way you deploy it for the production slot. Just substitute the new slot’s name or URL in the configuration of the deployment tool you use. If you use FTP to deploy, you see the FTP hostname and username just under the slot’s URL.
The new slot is effectively a separate web app with a different hostname. Anyone on the internet can access it if they know that hostname. Unless you register the slot with a search engine or link to it from a crawled page, the slot doesn’t appear in search-engine indexes. It remains obscure to the general internet user.
You can control access to a slot by using IP address restrictions. Create a list of IP address ranges that are allowed access to the slot or a list of ranges that are denied access to the slot. These lists are like the allow and deny ranges that you can set up on a firewall. Use this list to permit access only to computers that belong to your company or development team.
When you have a successful or business-critical web app, you need to update it to respond to business changes, user demands, or security issues, but you can’t allow service interruptions.
Suppose you work for a company that runs a popular social media web platform. The user interface for this platform is set up as an ASP.NET Core MVC web app hosted in Azure App Service. You regularly update the app’s source code and roll out the updates to production. These updates occasionally cause problems when testers fail to catch bugs. Also, service is briefly interrupted when you roll out an update, and responsiveness is slow while the code is deployed and compiled.
You want a way to deploy a new version of the app without downtime or a service interruption. You also want to be able to rapidly roll back a new deployment to the previous version if it causes problems.
Learning objectives
In this module, you will:
Create a deployment slot as a staging environment in App Service.
Use git to deploy a new version of a web app to a slot.
Configure which app settings are swapped and which aren’t swapped when you deploy a slot.
Swap slots to deploy a web app or roll back a deployment.
Prerequisites
Basic experience deploying apps to App Service
You must have your own Azure Subscription to complete this module
The following code is one possible solution for the challenge from the previous unit.
C#Copy
Console.WriteLine("This is the first line.");

Console.Write("This is ");
Console.Write("the second ");
Console.Write("line.");
This code is just one possible solution, among many possible ways to achieve the same result. However, you should have used both the Console.WriteLine() and Console.Write(String) methods to produce the desired output.
OutputCopy
This is the first line.
This is the second line.
If you were successful, congratulations! Continue to the next unit for a knowledge check.